Scraping Job Postings with Python : A Step-by-Step Tutorial for Beginners
Python is a strong tool to begin with data science for anybody who wants automation in collecting job posting data. This tutorial will show how one, even without prior experience or knowledge of coding but a bit foggy, can scrape job details from job portals using Python.
While generally speaking about sraping job listings in our previous article, How to Scrape Job listings : Methods & Tools, we will now try to show you how to perform this particular and not easy task of job data scraping by using Python.
If you want to skip the boredom of a manual job and have the latest job market information available easily, scraping job listings with Python offers a way to scale with your needs. If you want to find leads, look at job trends or make a database, this tutorial will give you hands-on experience.
Meanwhile, by trying out scraping job details, you will start noticing common problems such as pagination, AJAX-loaded content, and CAPTCHAs. All of these subjects will be touched upon in more advanced tutorials. But by the end of this tutorial, you’ll have a working Python script that automates job scraping datas from downloading HTML to saving data in a usable format (e.g., CSV).
Ready to get started?
You don't need to be a software engineer to scrape jobs with Python. But make sure you have these important things:
♦ Basic computer skills: You should know how to manage files and navigate in your system.
♦ Command line familiarity: A basic understanding of the terminal or command line will be useful for installing Python and libraries.
♦ A computer with internet: You'll need this to download Python and related tools.
Step 1: Environment and Project setup
Here is a quick explanation of how to install Python for different operating systems and which version to choose:
If you already have Python, Requests, BeautifulSoup4 and Pandas installed, you can skip Step 1 and directly go to Step 2 here.
1.1 Installing Python according to your OS
It is best to install with Python 3.8 or newer, since support for Python 2 has been dropped. For most users, the latest stable version of Python 3 is the best choice.
Setup Python in Windows
- Go to the official Python web site and download the latest Python 3 installer for Windows.
- Start the installer and select the box which says "Add Python to PATH." This is important.
- Click Install Now and follow the on-screen instructions.
After it is installed, open your command prompt- Windows Powershell and type in next command to verify the install.
python --version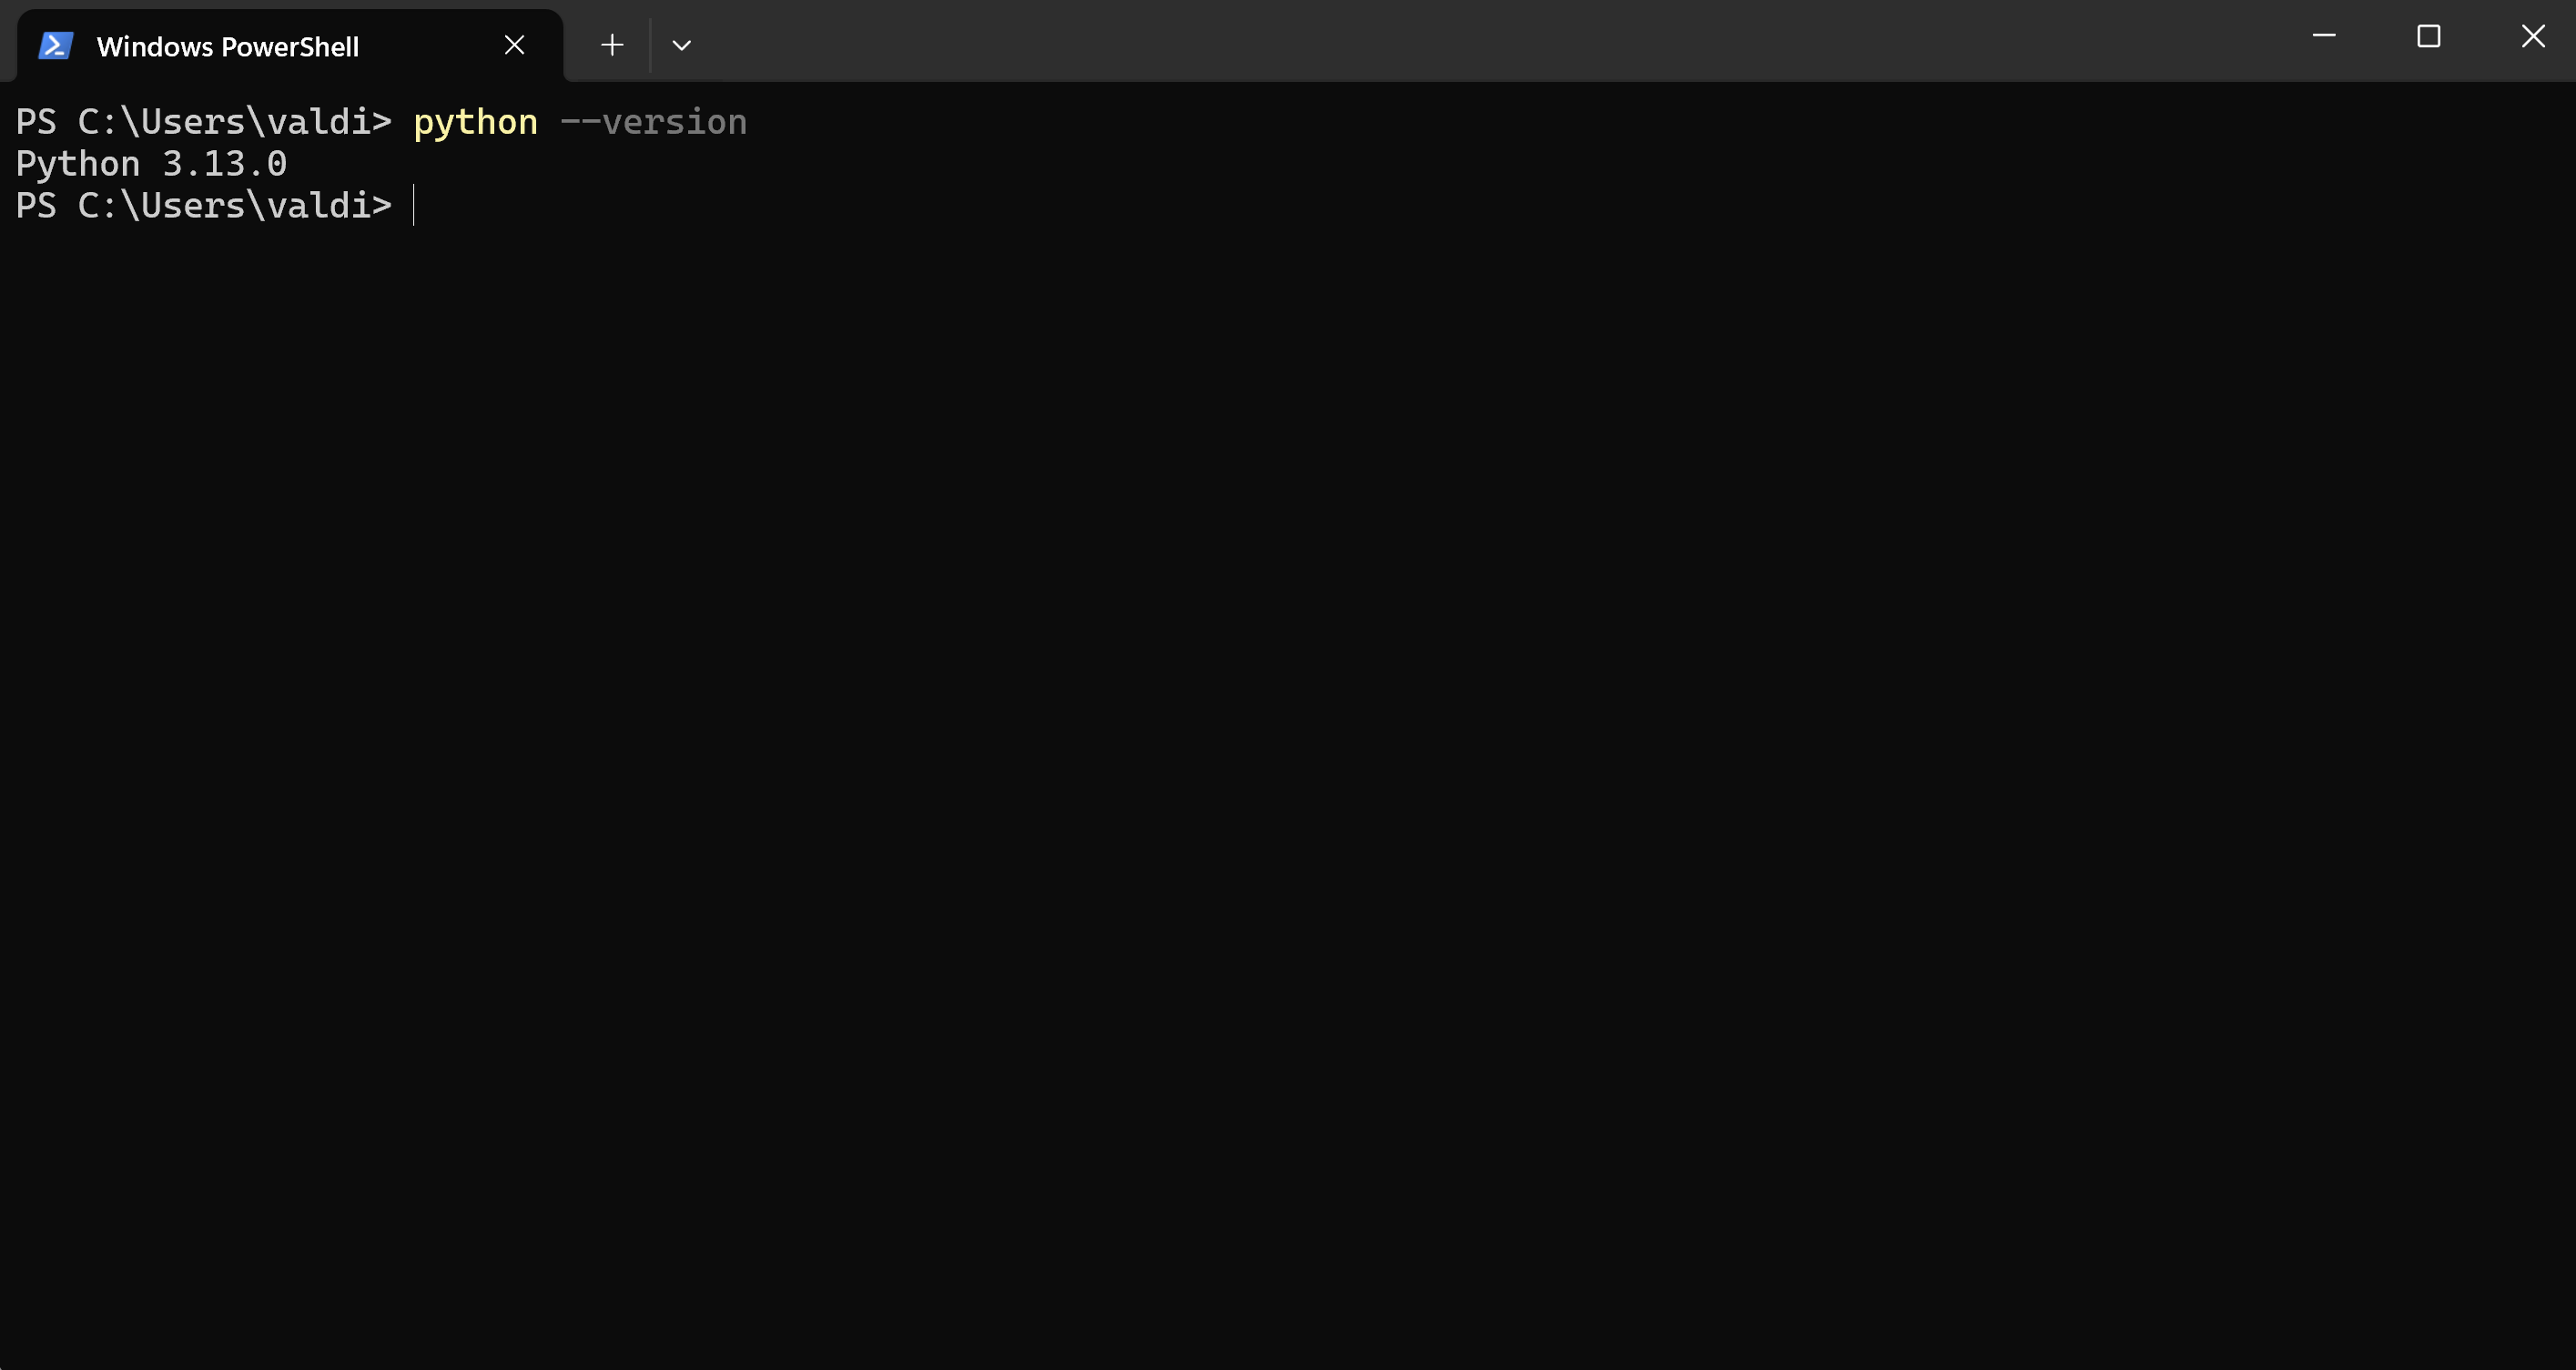
Install Python in Mac OS
- Open Terminal and run the following command to obtain the necessary developer tools :
xcode-select --install- Download the latest MacOs Python 3 installer straight from the Python website.
- Click Install Now and follow the on-screen instructions.
- Launch the downloaded file and follow the installation steps.
- Open Terminal after installation and type the next command to confirm it's installed - note use python3 instead of python since by default macOS comes with Python 2 installed.
python3 --version Install Python in Linux
- Open a terminal and update the package list by:
sudo apt update
- To install Python 3, execute:
sudo apt install python3
- After installation, check the version using:
python3 --version
Now that you have installed Python according to your OS, you can install the required libraries and set up your workspace.
1.2 Installing the Required Python Libraries
After you have Python installed, you will have to install some important libraries that we will use to scrape job postings. These include:
- Requests: Used in sending HTTP requests and downloading pages
- BeautifulSoup4: To read HTML and extracting data.
- Pandas: To save and manipulate the extracted data in a readable format such as CSV.
Here's how to set them up:
- Open your terminal or command prompt.
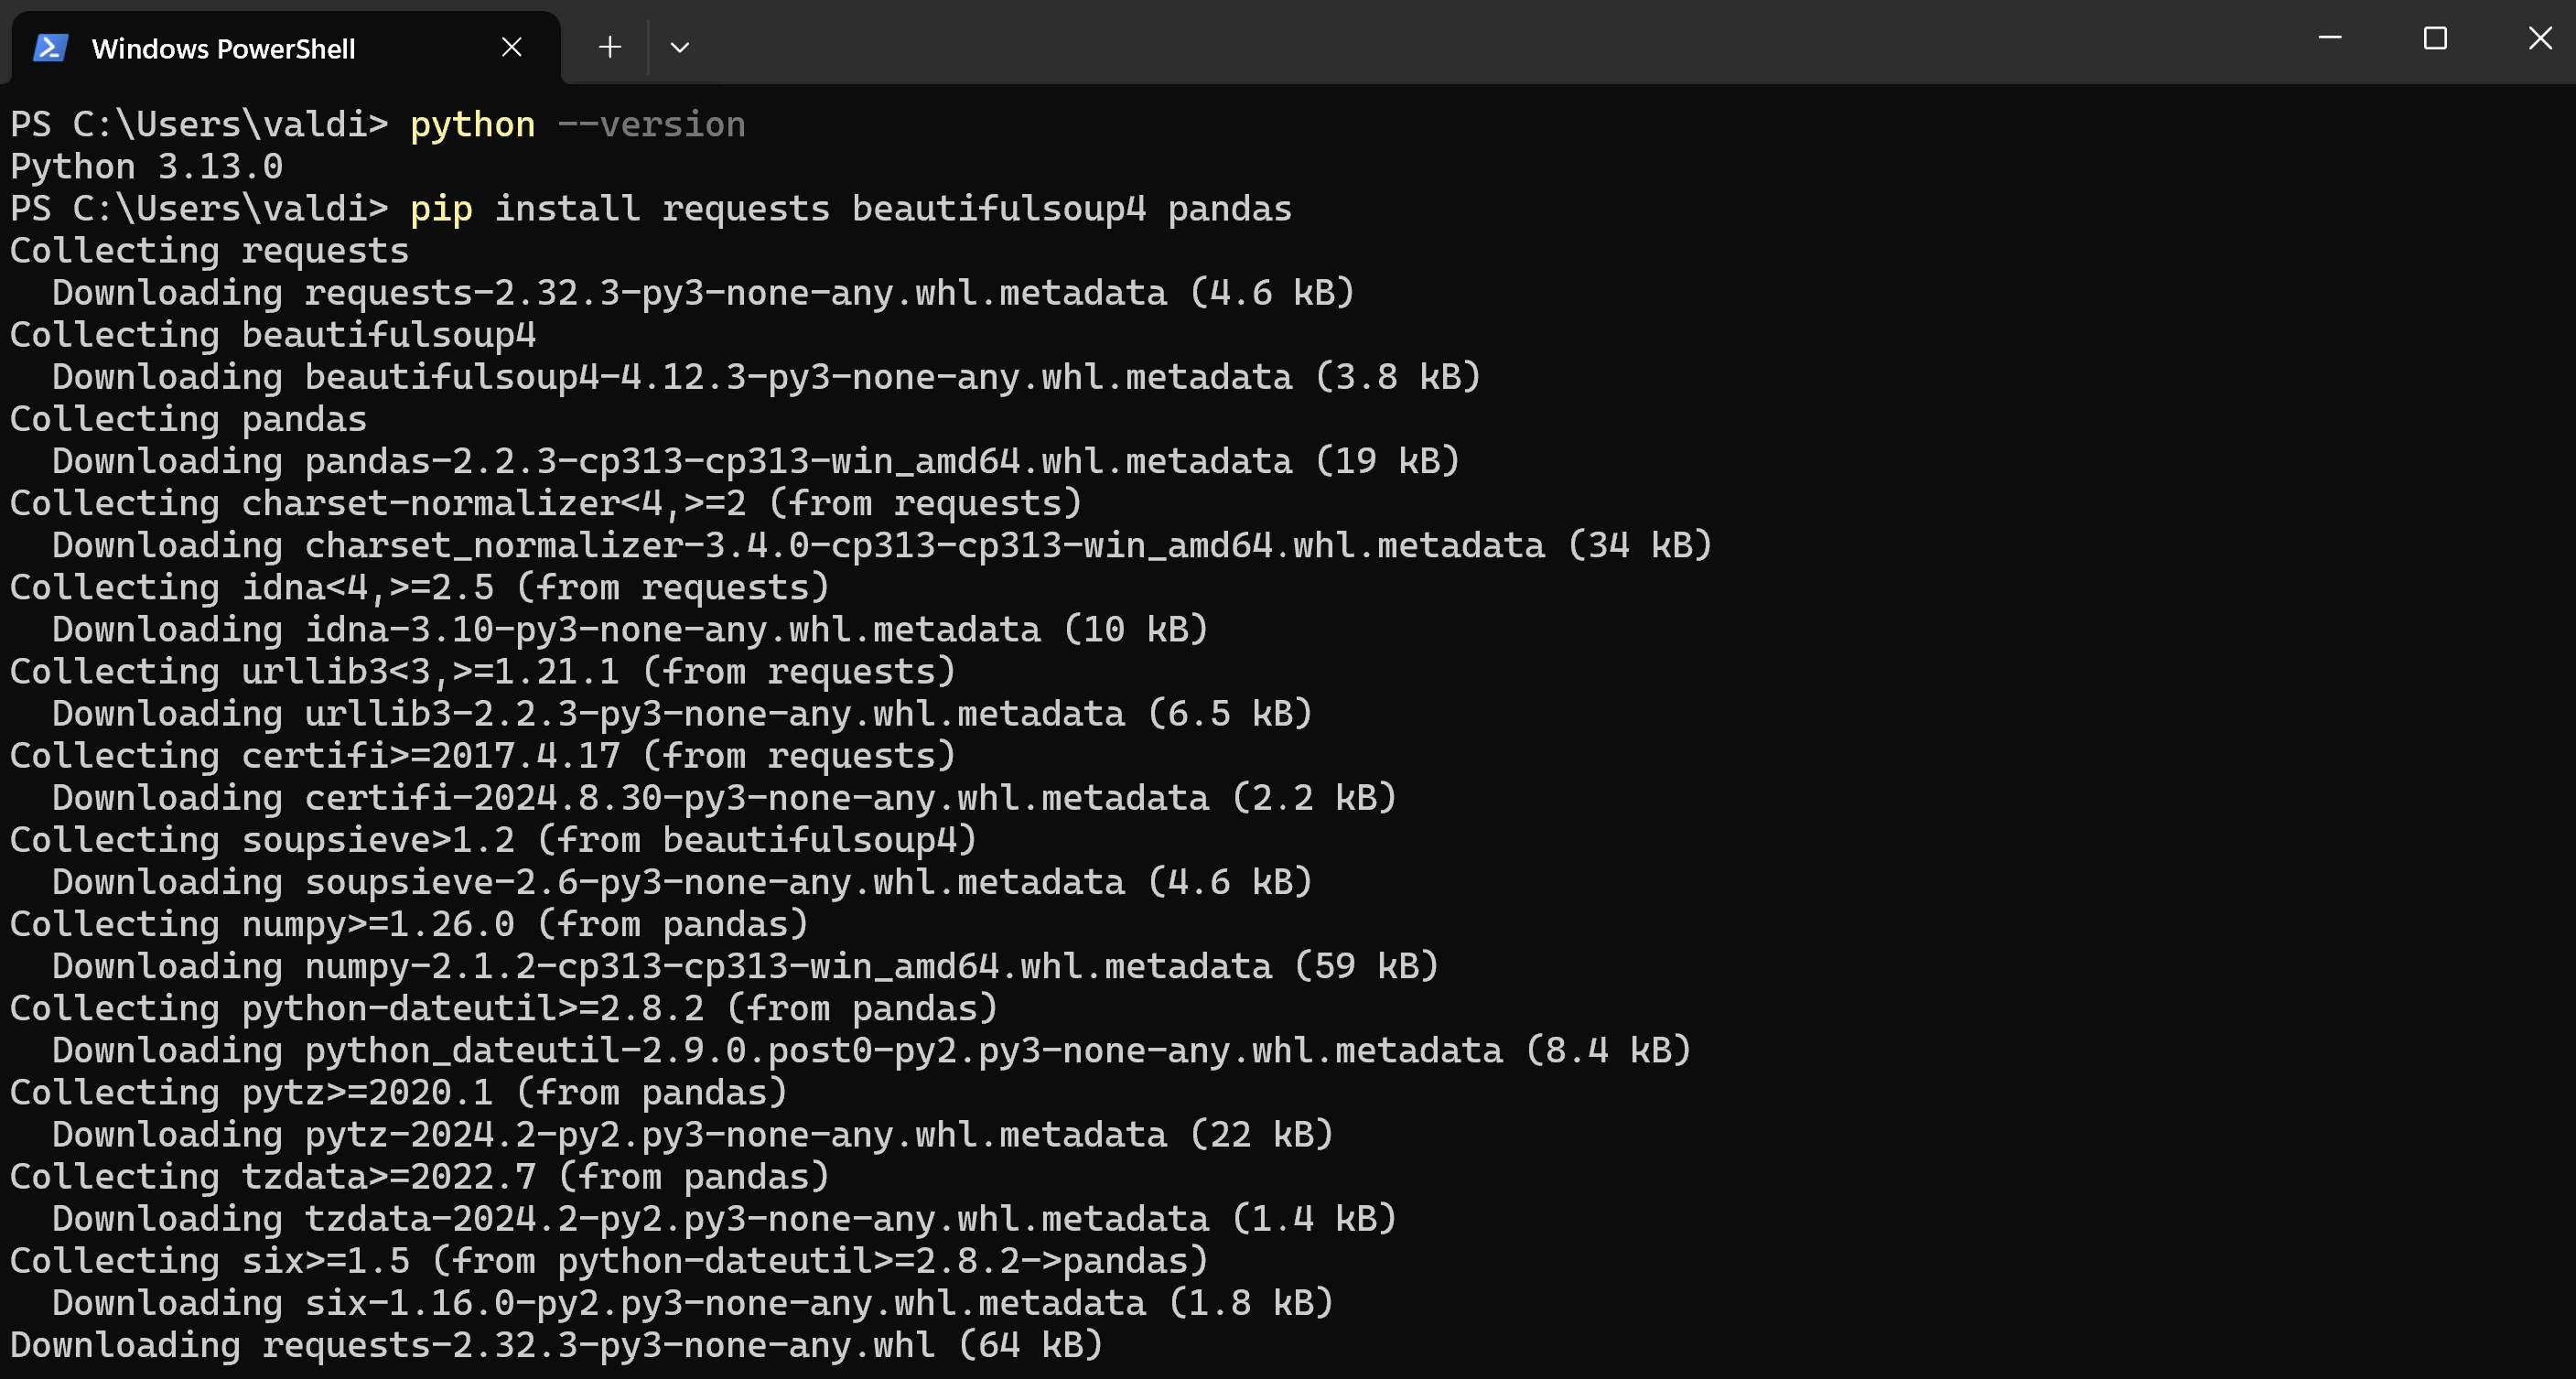
- Run the following command to install all 3 libraries in one step:
pip install requests beautifulsoup4 pandasIf everything gone right, the message "Successfully installed" had to appear.
1.3 Set up your environment for writing and running the Python code
1.3.1 Open or install a Text Editor
You will need a text editor to write your Python code. Some well-known choices are:
- VS Code - suggested to beginners.
- Sublime text
- Atom
Or you might follow along by opening the notebook in Google Colab.
1.3.2 Create a new Python file
In your text editor, create a new file and name it something like job_scraper_example.py . This is where you’ll write your Python jobs scraping project.
1.3.3 Import the librairies
Firstly in your Python file, you should import the libraries that you have installed just before. Here is the code that should be written in your file to efficiently scrape job postings:
import requests
from bs4 import BeautifulSoup
import pandas as pd
1.3.4 Save your file
After you add the imports save the file. You will be adding more code to it as you go through the tutorial.
1.3.5 Run the Python file
Run the Python file by opening the terminal or command prompt in the working directory containing your file.
Utilize the "cd" command to change directories into the good folder containing the file :
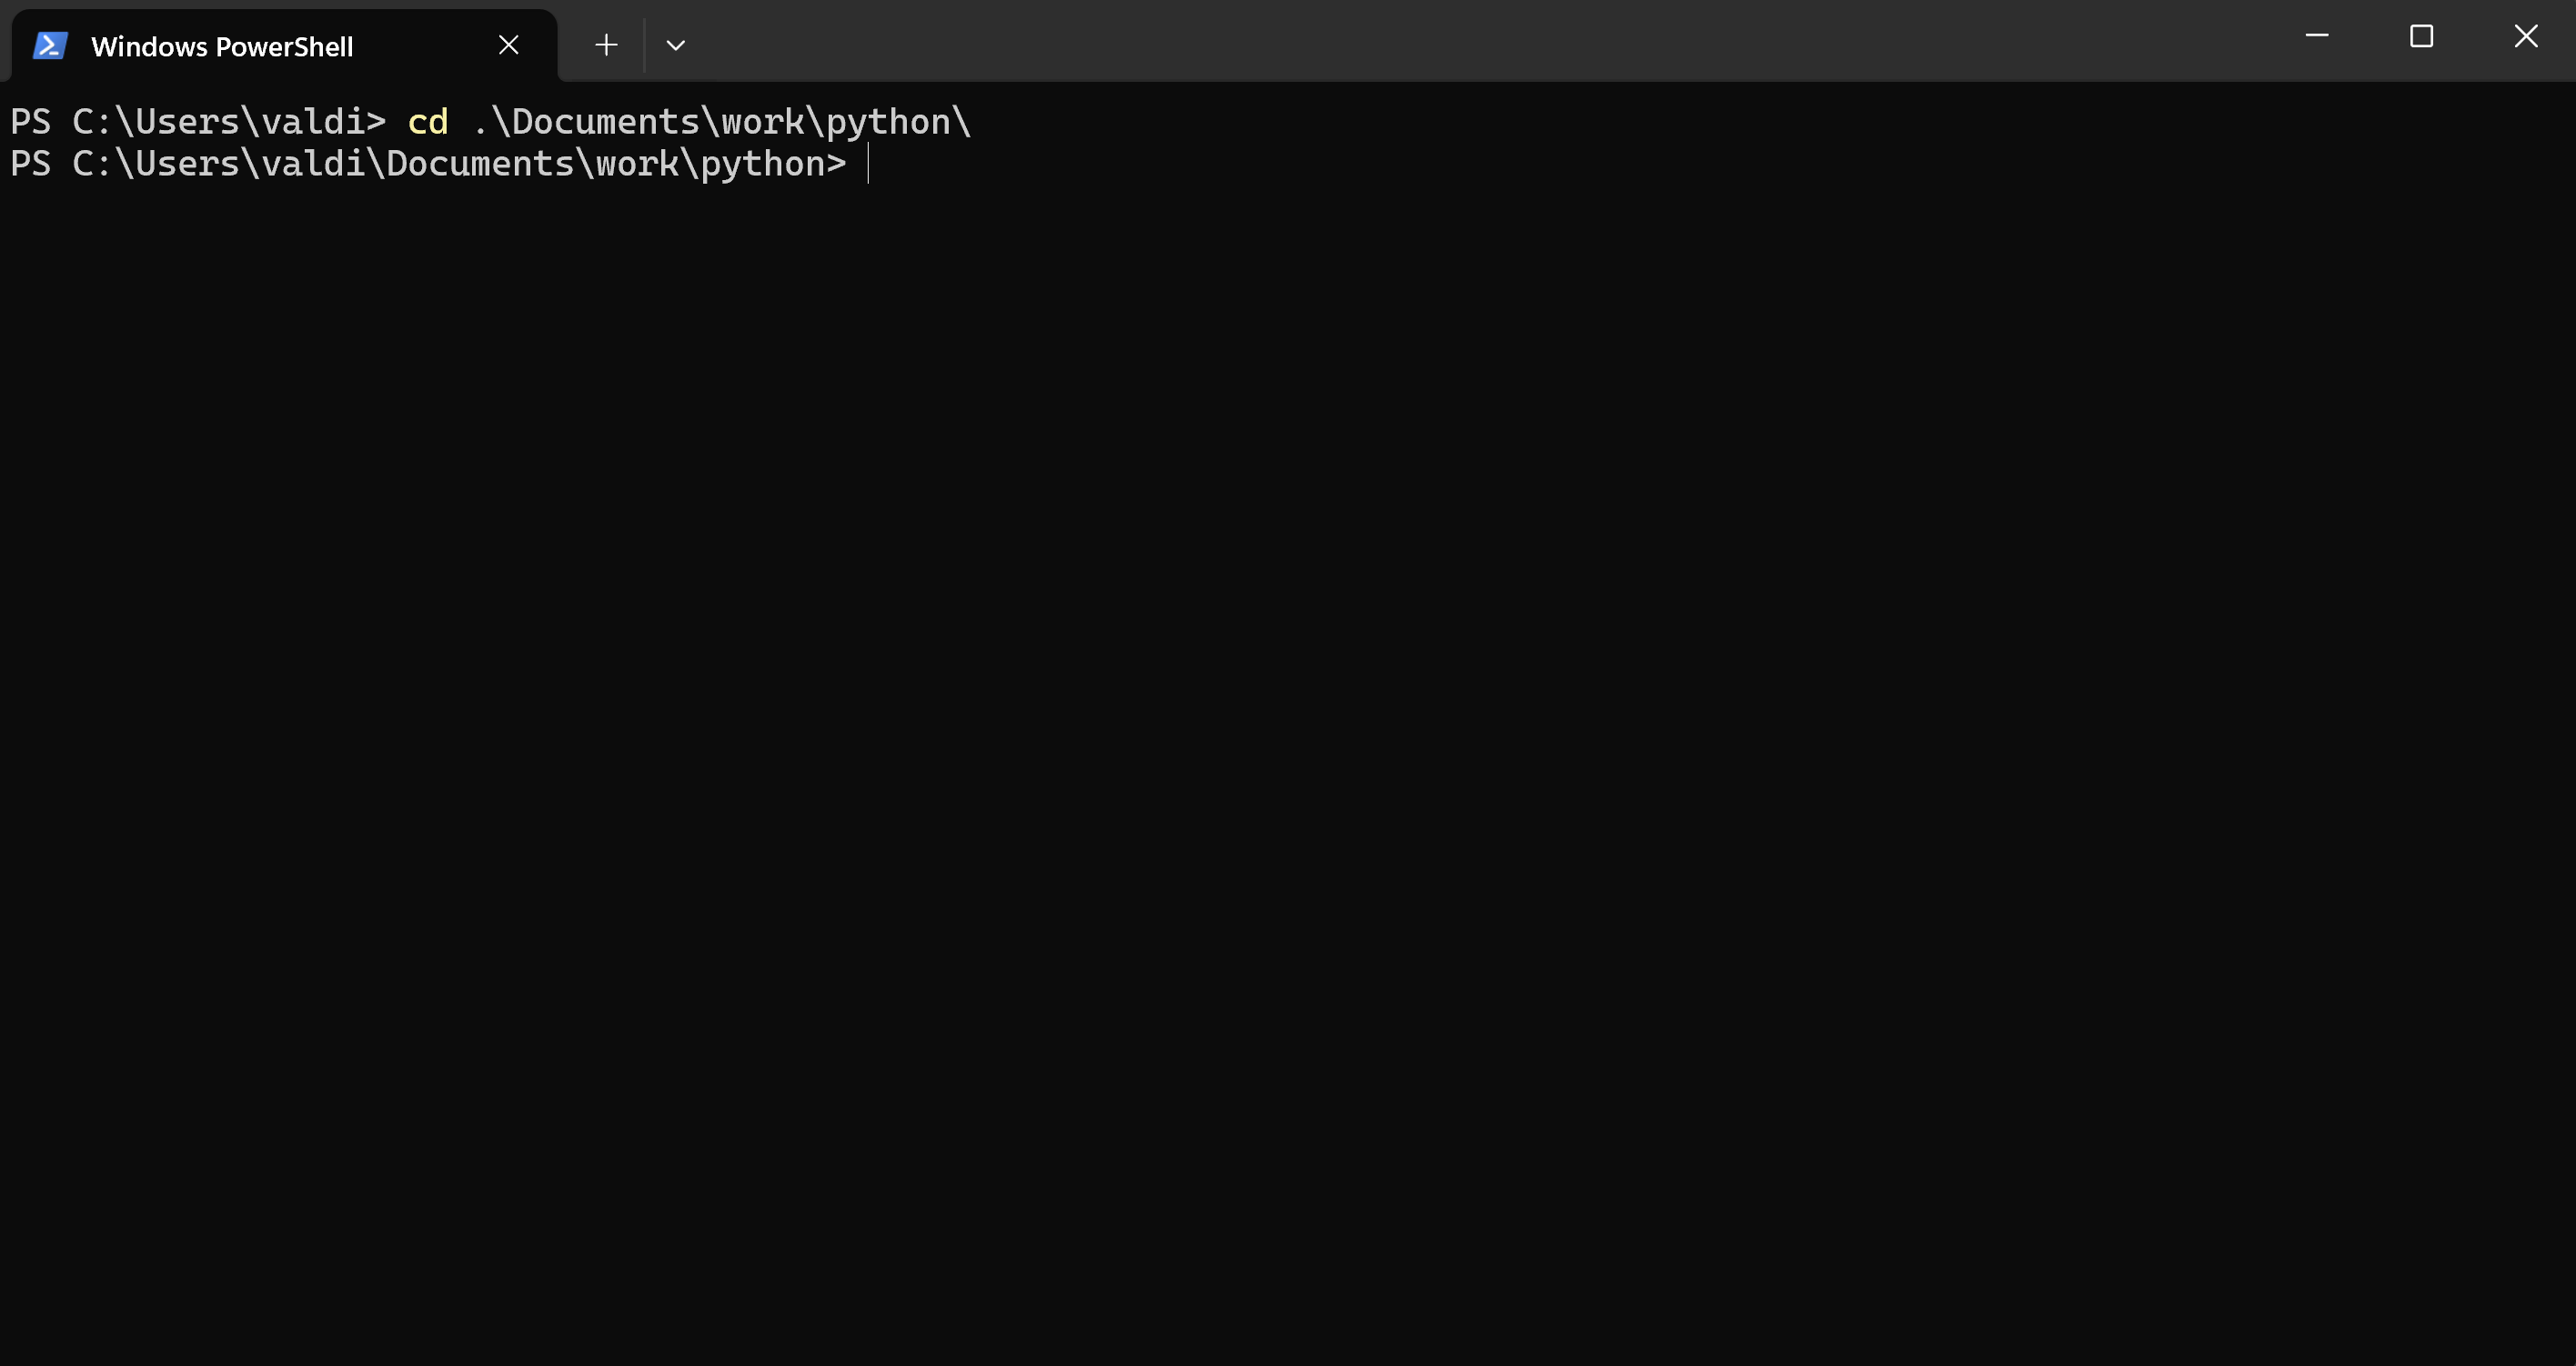
Or click right click on your folder that contains your python script and then right click > open in new terminal.
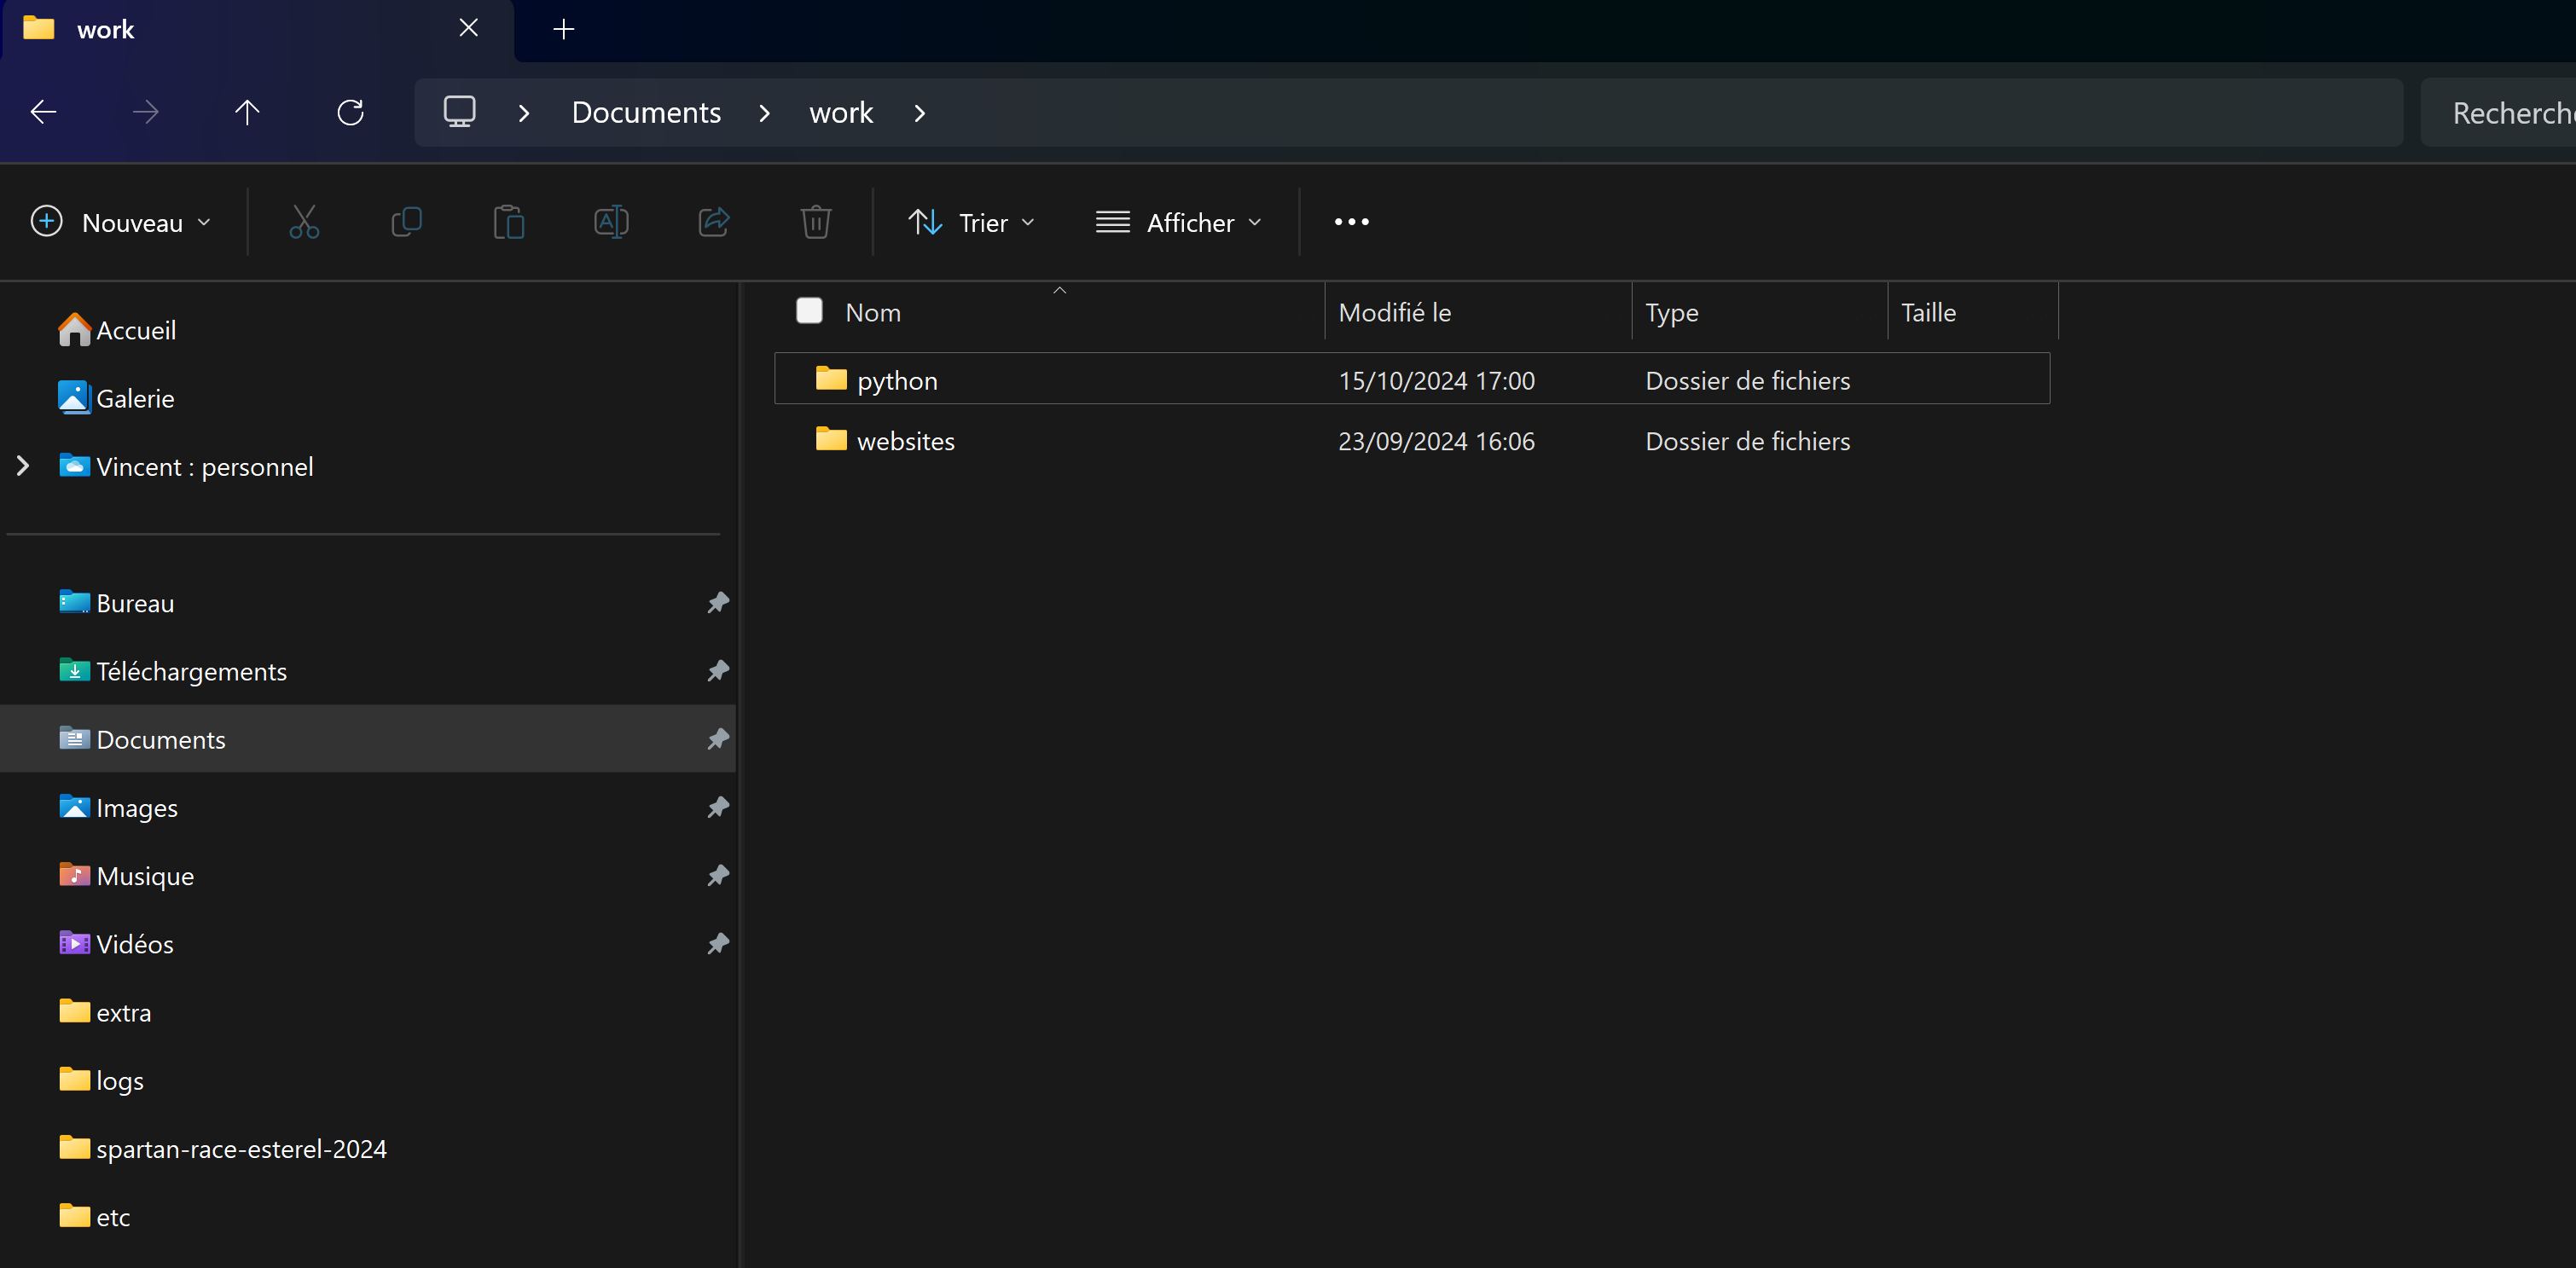
Run the file by typing:
python job_scraper-example.pyIf everything is set up right, the code will not raise any errors. If you don't see anything as output that's just fine for now-you've just prepared the environment and added the libraries.
Step 2: Learning About How Web Pages are Made
Before gathering data, you will have to know how web pages are made using HTML. HTML stands for Hypertext Markup Language and is the most-used "code" by websites; data from job postings usually lies inside various HTML tags. Understanding the HTML page structure will be the first step of the scraping process.
2.1 HTML Basics
2.1.1 HTML Elements
Web pages are composed of different HTML elements, all of them enclosed within tags: <div>, <h2>, <p>, among others. These tags will tell how the contents are laid out and presented-that is, how they are styled, using CSS stylesheets-on the page.
For instance:
- <div>: a container used to hold other elements.
- <h1> to <h6>: headings according to the level of importance, usually assigned to titles or highlights (like job title).
- <p>: a paragraph of text that could be filled with job details concerning a job posting.
These tags usually contain hidden job data, like a job title, company name, and location, and your job is to find them for web scraping.
When looking at HTML, elements have attributes like class and id that help show their structure.
2.1.2 HTML Attributes, IDs and Classes
Classes (class): Used to group similar things, like job titles:
<h2 class="jobTitle">Python Developer</h2>IDs: Special numbers that identify elements.
<div id="job-12345">Job Details</div>These features will help while finding elements when data is collected using Python's BeautifulSoup.
2.2 Find and look at target data on job boards
That requires parsing the HTML to find those parts that contain the job information. This is how you can do that:
2.2.1 Open the Job Board in your web browser
Open a job board like Indeed and opened any page showing the job openings. For example, this one was chosen on our tutorial:
We will discuss other job boards scraping in an advanced Job board web scraper tutorial.
If you want to scrape data from another job offer, you can choose another one from Indeed.
2.2.2 Use Developer Tools to inspect the Page
Right-click on any part of the page and choose Inspect (or press Ctrl+Shift+I on Windows or Cmd+Option+I on Mac). This opens the browser’s Developer Tools, where you can see how the page is built using HTML.
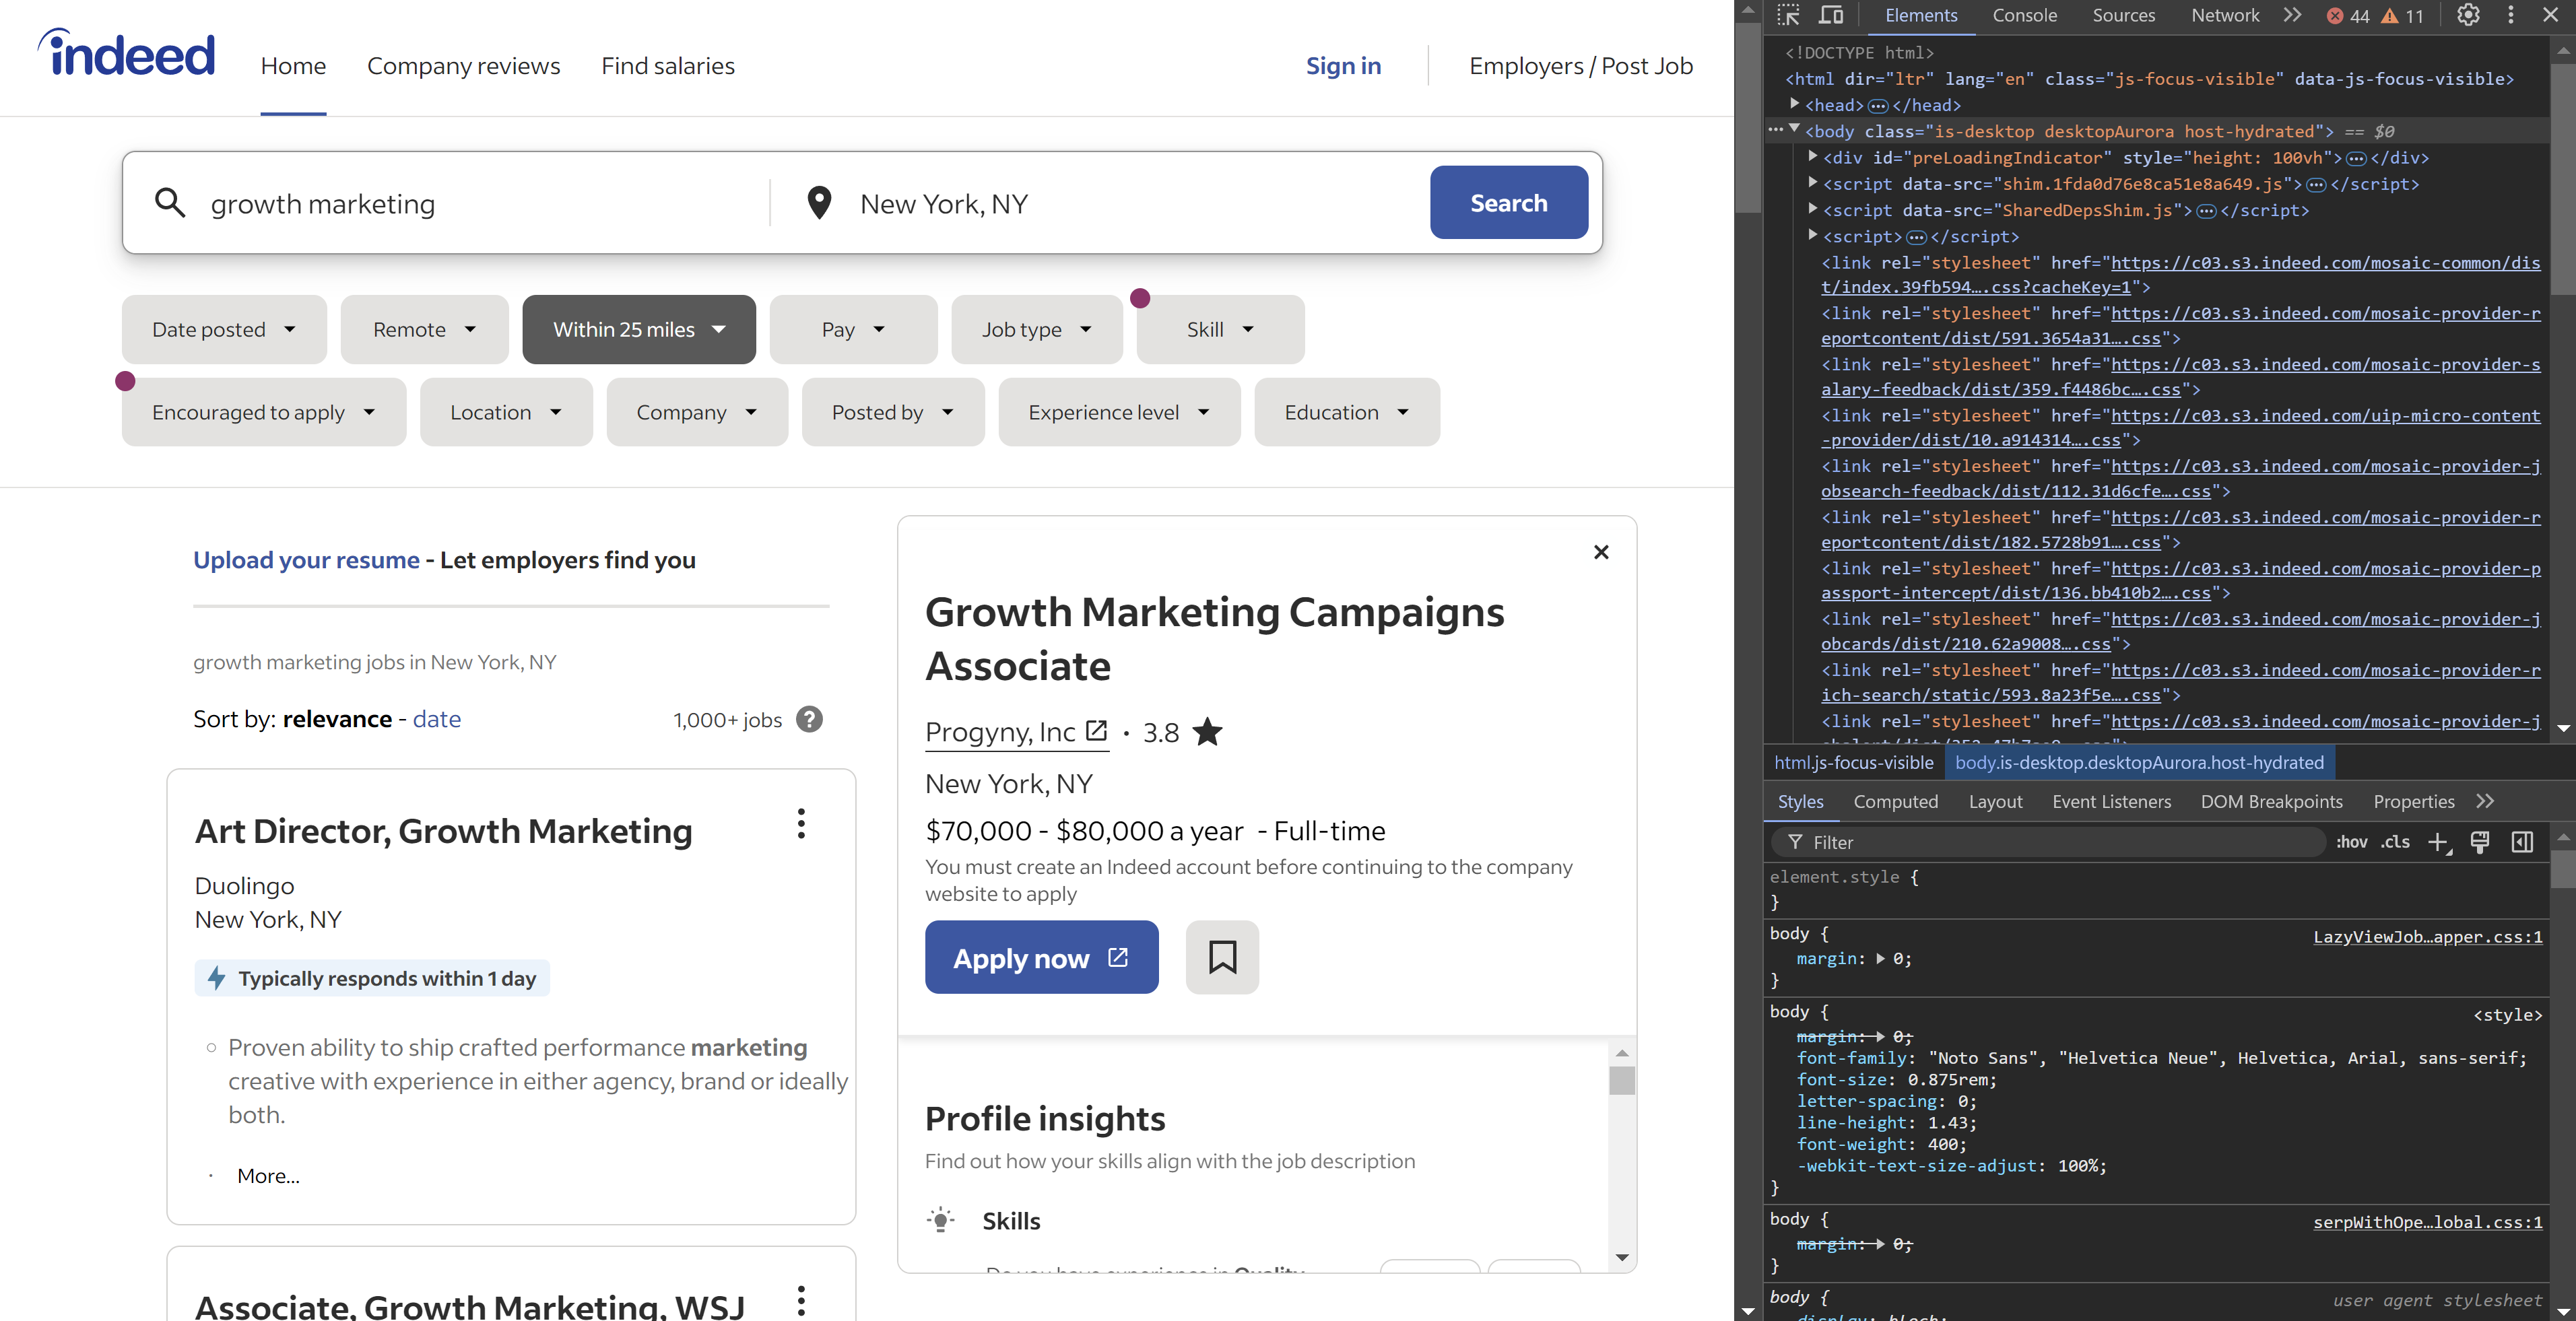
2.2.3 Use Developer Tools to inspect the Page
When the Developer Tools are open, you can use the element selector tool to quickly find the HTML elements that have the job data you want. Follow these steps:
- In the Developer Tools Elements tab, click the little cursor icon. It looks like a square with a mouse pointer in it and is usually at the top left of the Developer Tools window. This is the element selector.

- Click on the part of the page containing the information you want to scrape, like job title, company name, and location. The chosen element will be highlighted in the Elements tab, where it will show you exactly which part of the code includes the data. Here is the code with the job title "Growth Marketing Campaigns Associate":
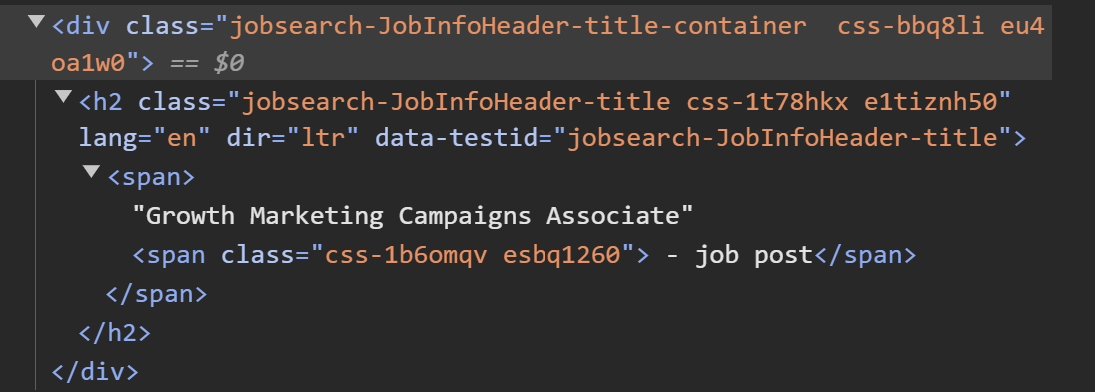
Now, hover your mouse over various elements on the web page. Notice that as each element is hovered over, its HTML code appears highlighted in the Developer Tools panel.
Step 3: Fetching HTML Content with Requests
3.1 Understanding HTTP Requests: How It Works?
Whenever you access any webpage through your browser, it shoots an HTTP request to the server hosting the site. The server does some processing on this request and sends back the complete code, typically as HTML-to put it bluntly-your browser visually displays.
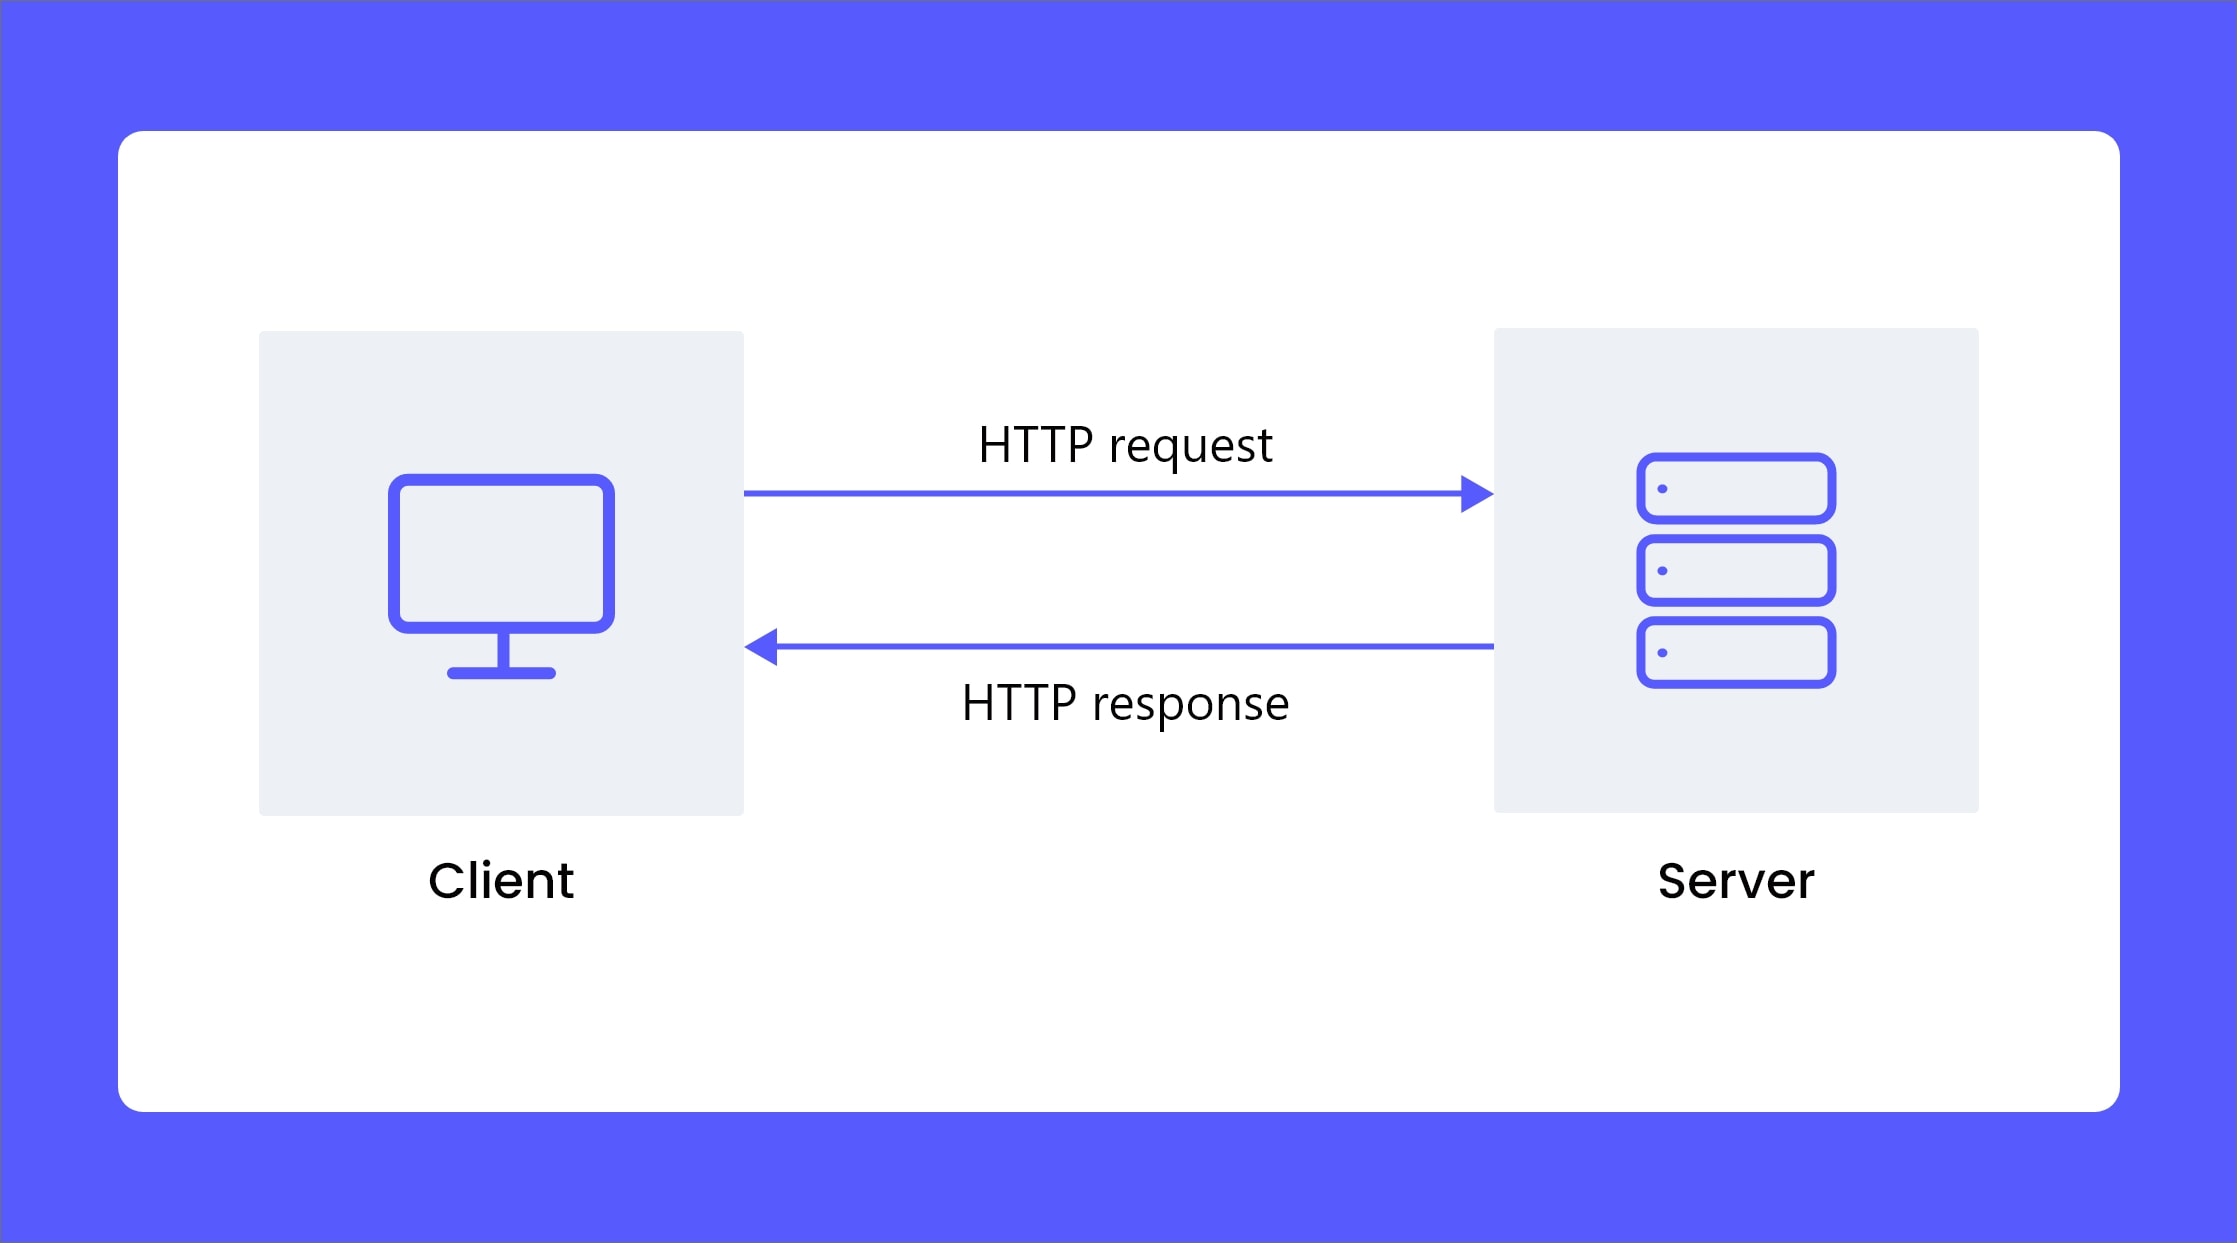
That is what one does in web scraping. In this case we will apply the Python Requests library to download its HTML content instead of displaying the page in a browser.
3.2 Retrieving HTML using requests.get()
3.2.1 Code Example : a basic request
First, we'll be requesting information with the requests.get(). It will fetch the HTML of the web page so that we can use it later on.
Here is how you could do that:
import requests

# Target page URL (example from Indeed)
url = 'https://www.indeed.com/jobs?q=growth+marketing&l=New+York%2C+NY&from=searchOnDesktopSerp&vjk=655c187a6107ac6'

# Send a GET request to fetch the HTML content of the page
response = requests.get(url)

# Check if the request was successful
if response.status_code == 200:
    print("Page downloaded successfully")
else:
    print("Failed to retrieve the page. Status code: {response.status_code}")
If you execute this code with the Indeed URL, a 403 status Forbidden will be returned:
Failed to retrieve the page. Status code: 403This is because job market platforms such as Indeed or LinkedIn prevent the automatic scraping of their data. The server recognizes that instead of the request coming from a normal browser, it is actually coming from a script (Python's requests library in this case).
This is one of the first challenges in web scraping: how to bypass such restrictions?
3.2.2 Testing Requests with a different URL
Don't just take my word for it—see for yourself on any other site! Use a link from Wikipedia, such as:
url = 'https://en.wikipedia.org/wiki/Python_(programming_language)'Guess what?
You will get a positive response because Wikipedia doesn’t have the same level of restrictions. This time, you’ll see:
Page downloaded successfully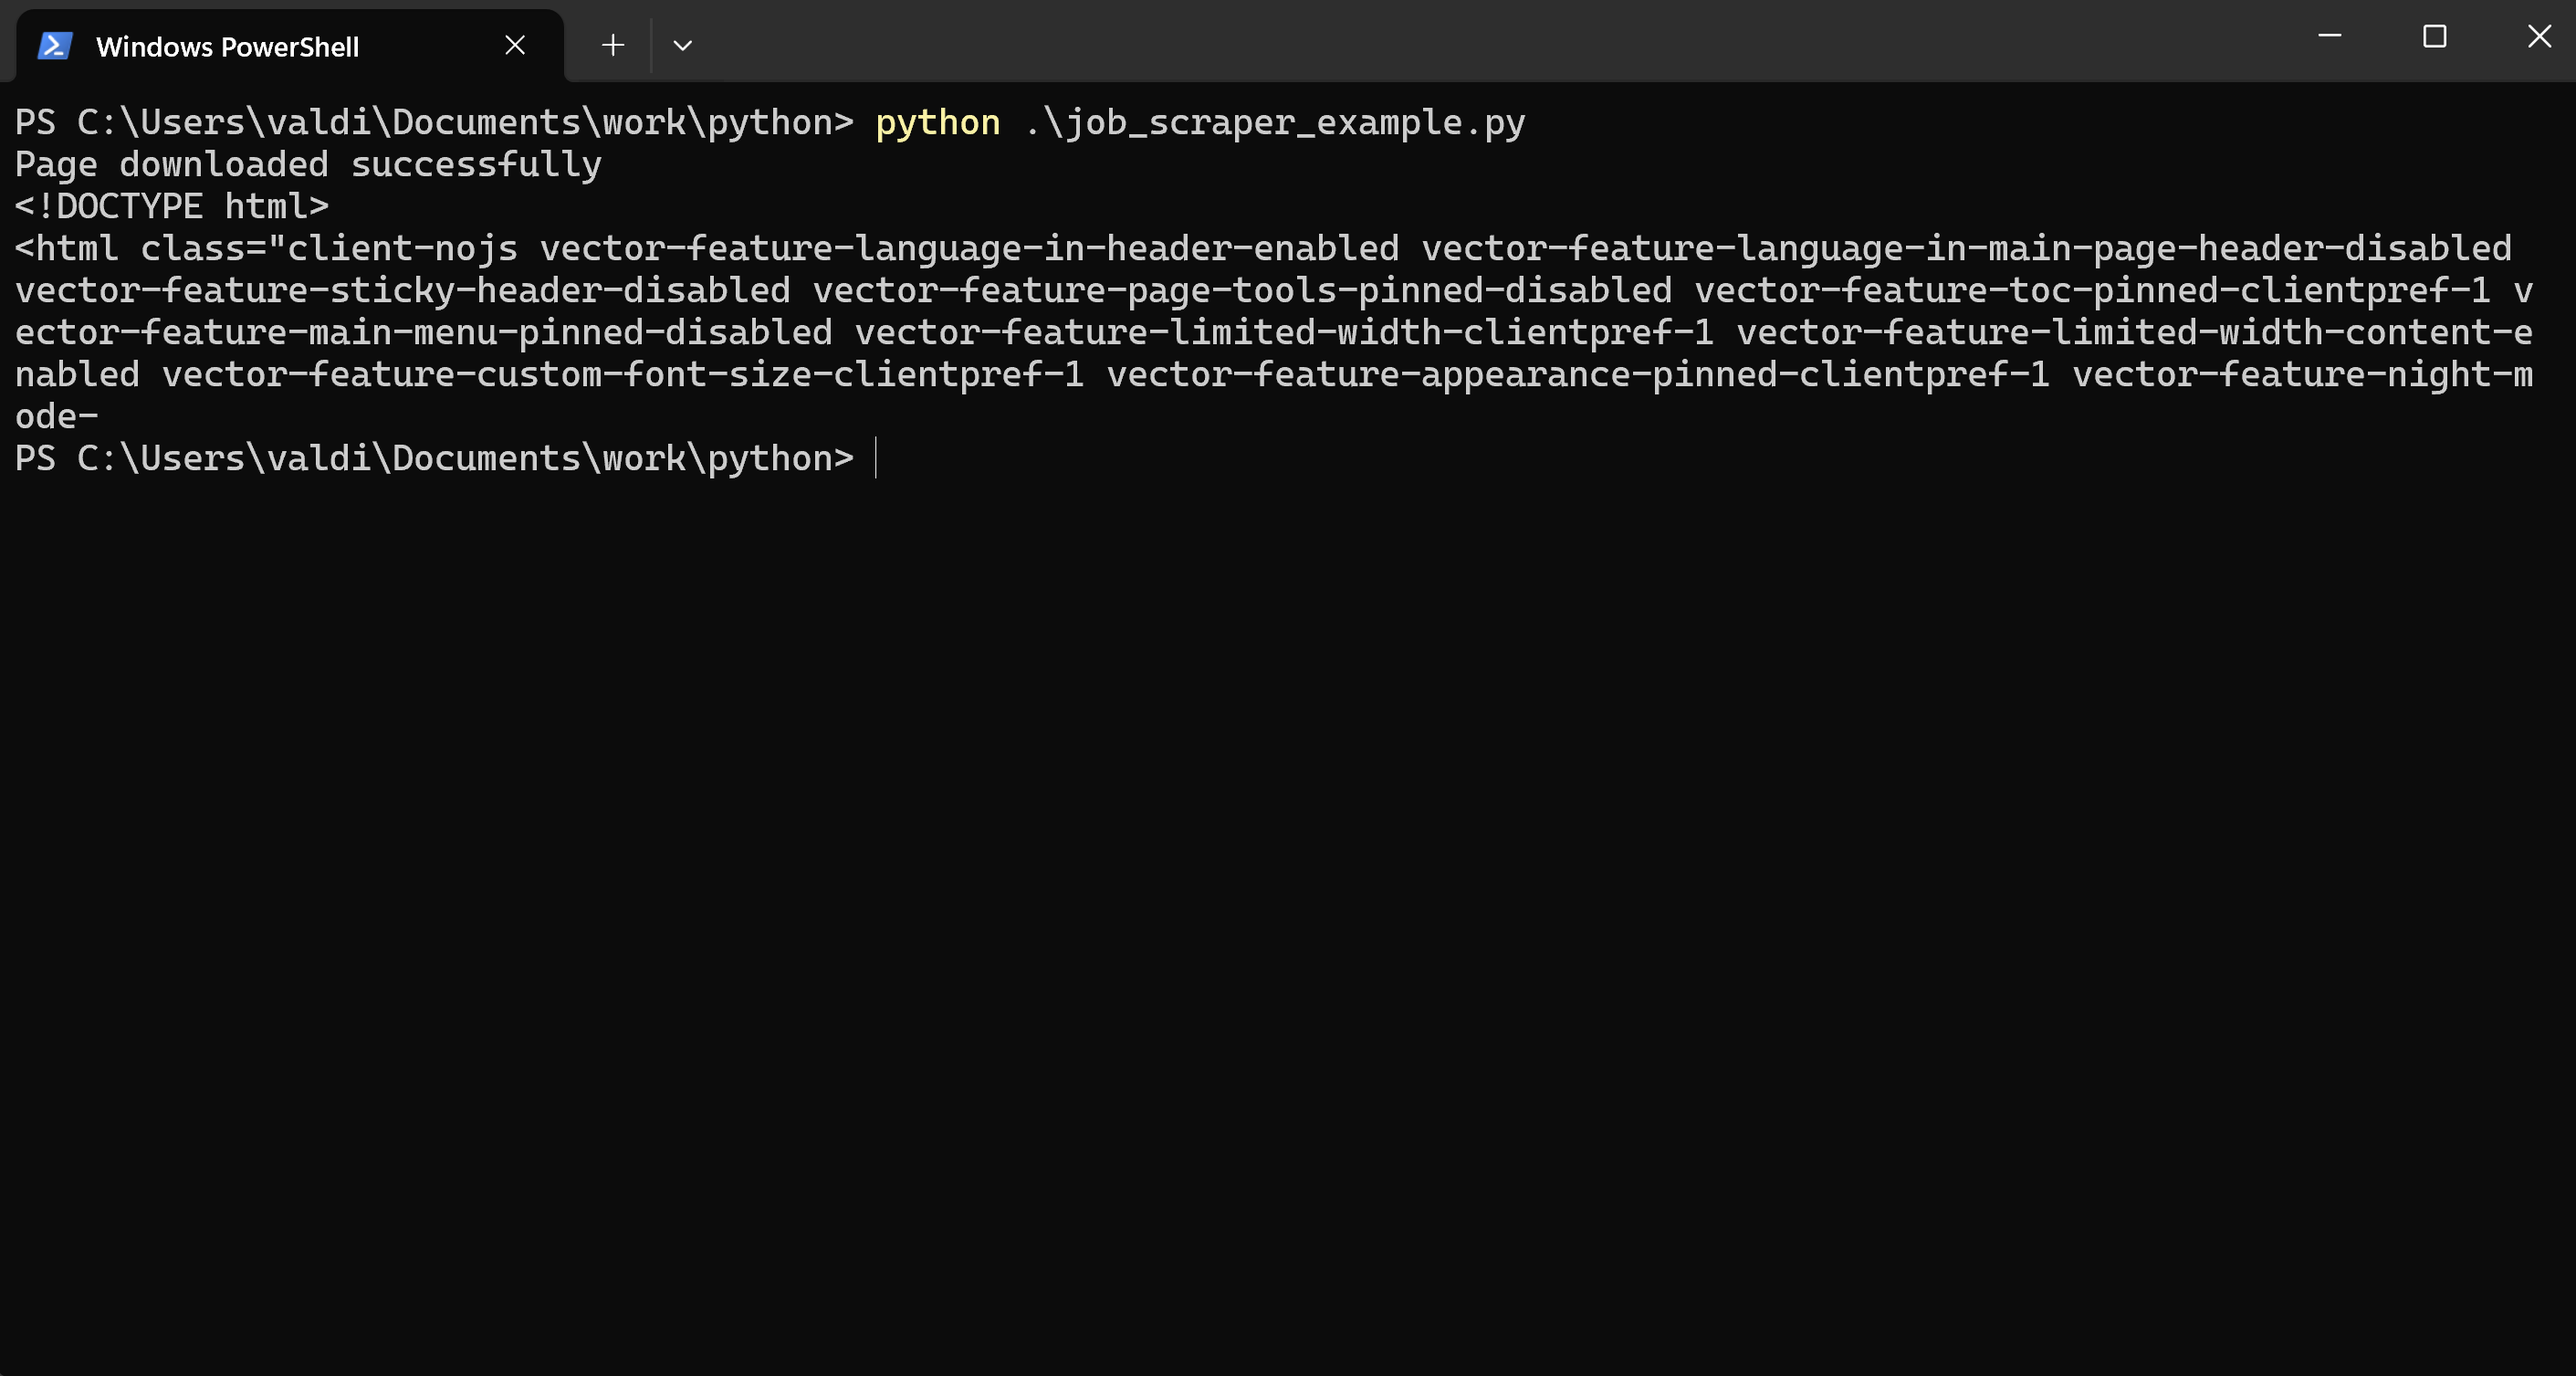
3.3 Bypass Server Restrictions: First Approach to Successfully Retrieve HTML
Another thing we can do to make our request look like it's coming from an actual user is add a User-Agent header to our request. It's like creating our own identity card that corresponds to the profile the server accepts.
This notifies the server that a browser is requesting something, which can helps us from getting blocked.
import requests
from bs4 import BeautifulSoup
import pandas as pd

# URL of the job listings page
# url = 'https://www.indeed.com/jobs?q=growth+marketing&l=New+York%2C+NY&from=searchOnDesktopSerp&vjk=655c187a6107ac61'

# Adding headers to mimic a real browser request
headers = {
    'User-Agent': 'Mozilla/5.0 (Windows NT 10.0; Win64; x64) AppleWebKit/537.36 (KHTML, like Gecko) Chrome/91.0.4472.124 Safari/537.36'
}

# Send a GET request to fetch the HTML content of the page
response = requests.get(url, headers=headers)

# Check if the request was successful
if response.status_code == 200:
    print("Page downloaded successfully")
    # Print a portion of the HTML content to verify
    print(response.text[:500])  # Show the first 500 characters of the HTML
else:
    print(f"Failed to retrieve the page. Status code: {response.status_code}")
After you insert the User-Agent header, so that a request appears to be coming from a browser, the script runs once more.
Even with the updated header, the server can detect automated requests, and you will likely see again:
Failed to retrieve the page. Status code: 403Of course, especially for job boards, which protect their data extremely carefully.
To proceed, to scrape such websites, you may need more advanced solutions, such as:
- Using tools like Selenium to simulate real browser behavior.
- Changing IP addresses using proxies. (covered in a separate tutorial, and you normally won't reach the point of IP blocking here)
- Dealing with CAPTCHAs and other types of access control. (also addressed in a separate guide)
3.4 Bypass Server Restrictions: Second Approach Using a Headless Browser like Selenium to Simulate Human Navigation
3.4.1 Install Selenium
First, you should install Selenium and the correct WebDriver for your browser. Here's how:
To install Selenium, in your terminal or command prompt type:
pip install selenium3.4.2 Install a WebDriver
A WebDriver acts through code to handle the interaction with a web browser. It emulates user actions, from clicks to scrolls. This is also useful in scraping dynamic content (content that requires user interaction to appear).
Selenium needs a WebDriver to manage a browser.
For this tutorial, the steps will be shown using ChromeDriver and the Chrome browser. If you prefer to use a different browser, you'll need to manage its installation without additional guidance.
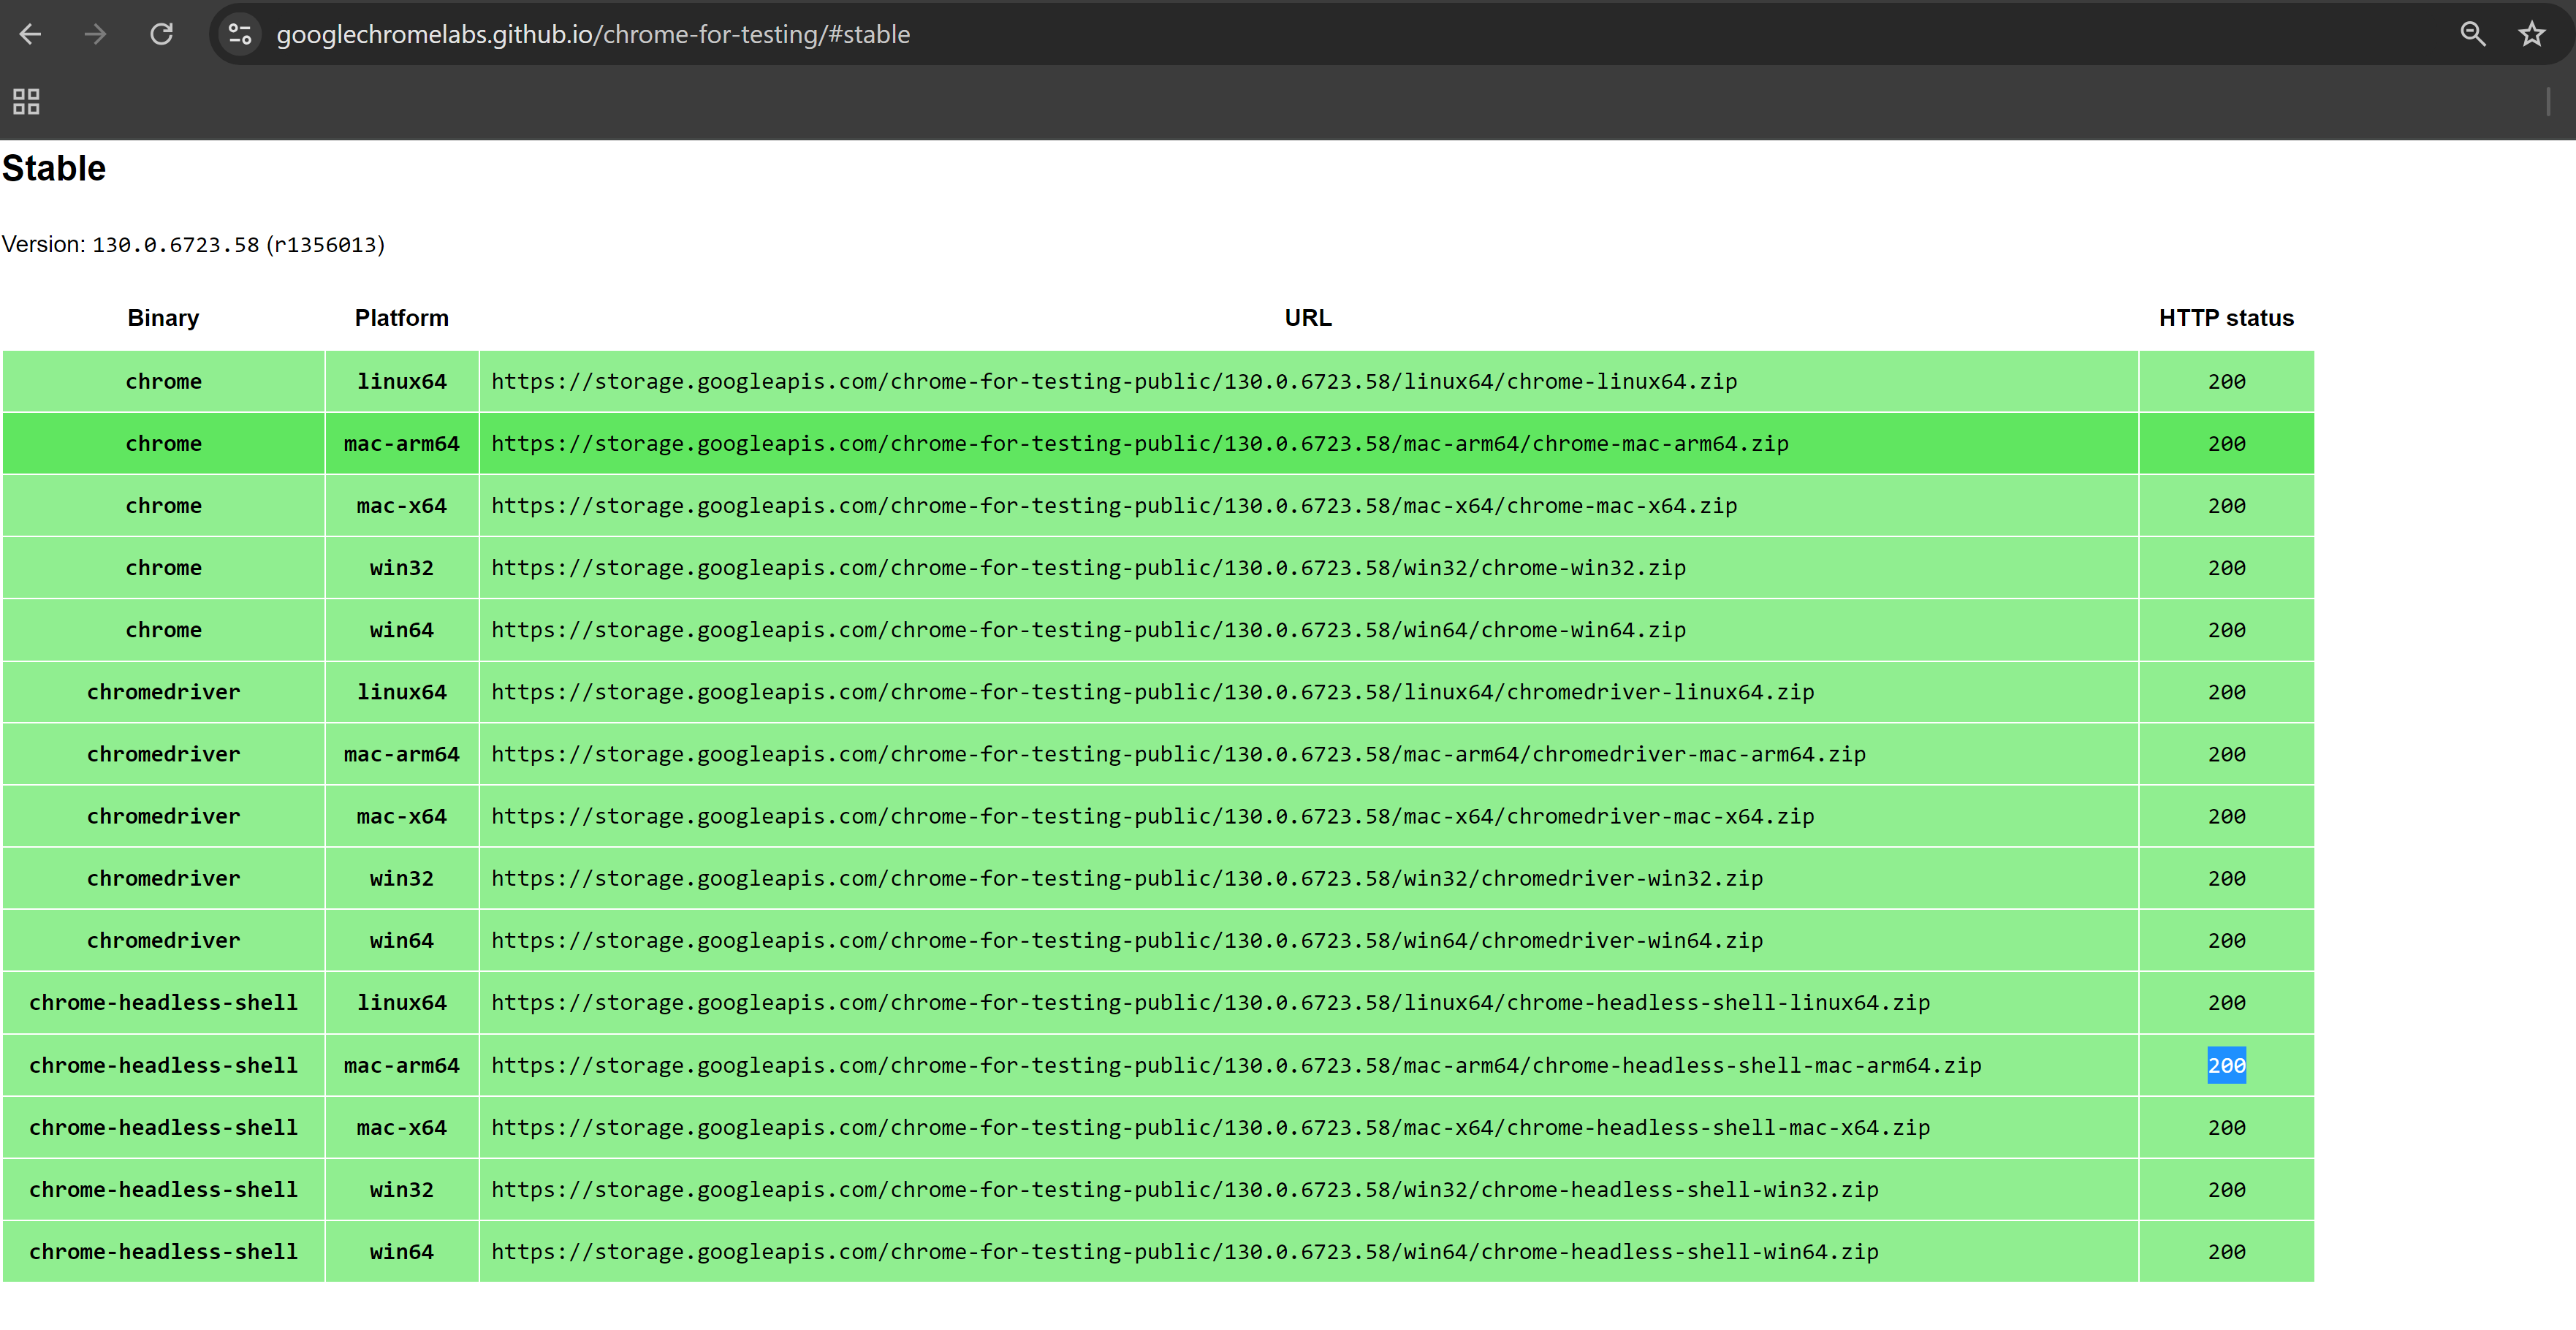
Firstly, just to let you know what version of Chrome you have, open Chrome, click the three dots in the top right, go to Help, then About Google Chrome, and you'll find out.
Then, follow the next steps :
- Go to the page to download ChromeDriver
- Scroll down to the table: You will see a table containing various ChromeDriver versions. Under "Binary", you'll see a link from which to download ChromeDriver.
- Find your platform: In the "Platform" column, choose the version corresponding to your operating system. For this example, we’ll use Windows 64-bit.
Example URL: If you have Windows 64-bit, you can fetch ChromeDriver using a link like the following: https://storage.googleapis.com/chrome-for-testing-public/130.0.6723.58/win64/chromedriver-win64.zip
- Change the version number: Replace the version number 130.0.6723.58 in the URL with the version of Chrome you have. Your version number can be found as explained earlier.
For example, if your chrome version is 115.0.5790.98, then link would be: https://storage.googleapis.com/chrome-for-testing-public/115.0.5790.98/win64/chromedriver-win64.zip
- Download and uncompress: Once you have updated the URL, copy it into your browser, download the .zip, and open it at a location on your system.
- Set the path to the driver: Once you download that file, remember where you save it. You're going to need that path when you go to configure Selenium in your script.
#ChromeDriver path example
C:\Users\valdi\Documents\work\python\lib\chromedriver-win64You don’t run it directly; instead, you configure Selenium to use it in your script.
3.4.3 Write the Selenium Script to download HTML
import requests
from bs4 import BeautifulSoup
from selenium import webdriver
from selenium.webdriver.chrome.service import Service
from selenium.webdriver.common.by import By
from selenium.webdriver.chrome.options import Options
import time
import pandas as pd

# Set up Chrome options
chrome_options = Options()
chrome_options.add_argument("--headless")  # Run Chrome in headless mode (without GUI)

# Path to your ChromeDriver
webdriver_path = r'C:\Users\valdi\Documents\work\python\lib\chromedriver-win64\chromedriver.exe'  # Replace with your actual path

# Set up the WebDriver
service = Service(webdriver_path)
driver = webdriver.Chrome(service=service, options=chrome_options)

# Target URL of the job listings page
url = 'https://www.indeed.com/jobs?q=growth+marketing&l=New+York%2C+NY&from=searchOnDesktopSerp&vjk=655c187a6107ac61'

# Open the job board page
driver.get(url)

# Give time for the page to load completely
time.sleep(10)  # You can adjust this depending on the page load time

# Fetch the page's HTML content
page_source = driver.page_source

# Print a portion of the page to check
print(page_source[:1000])  # Print the first 1000 characters of the HTML

# Close the WebDriver
driver.quit()
With the Selenium setup complete, you can execute the script.
You should see something like the printing of HTML content. By this time, you might think that all is well because your script has gotten the source of the page.
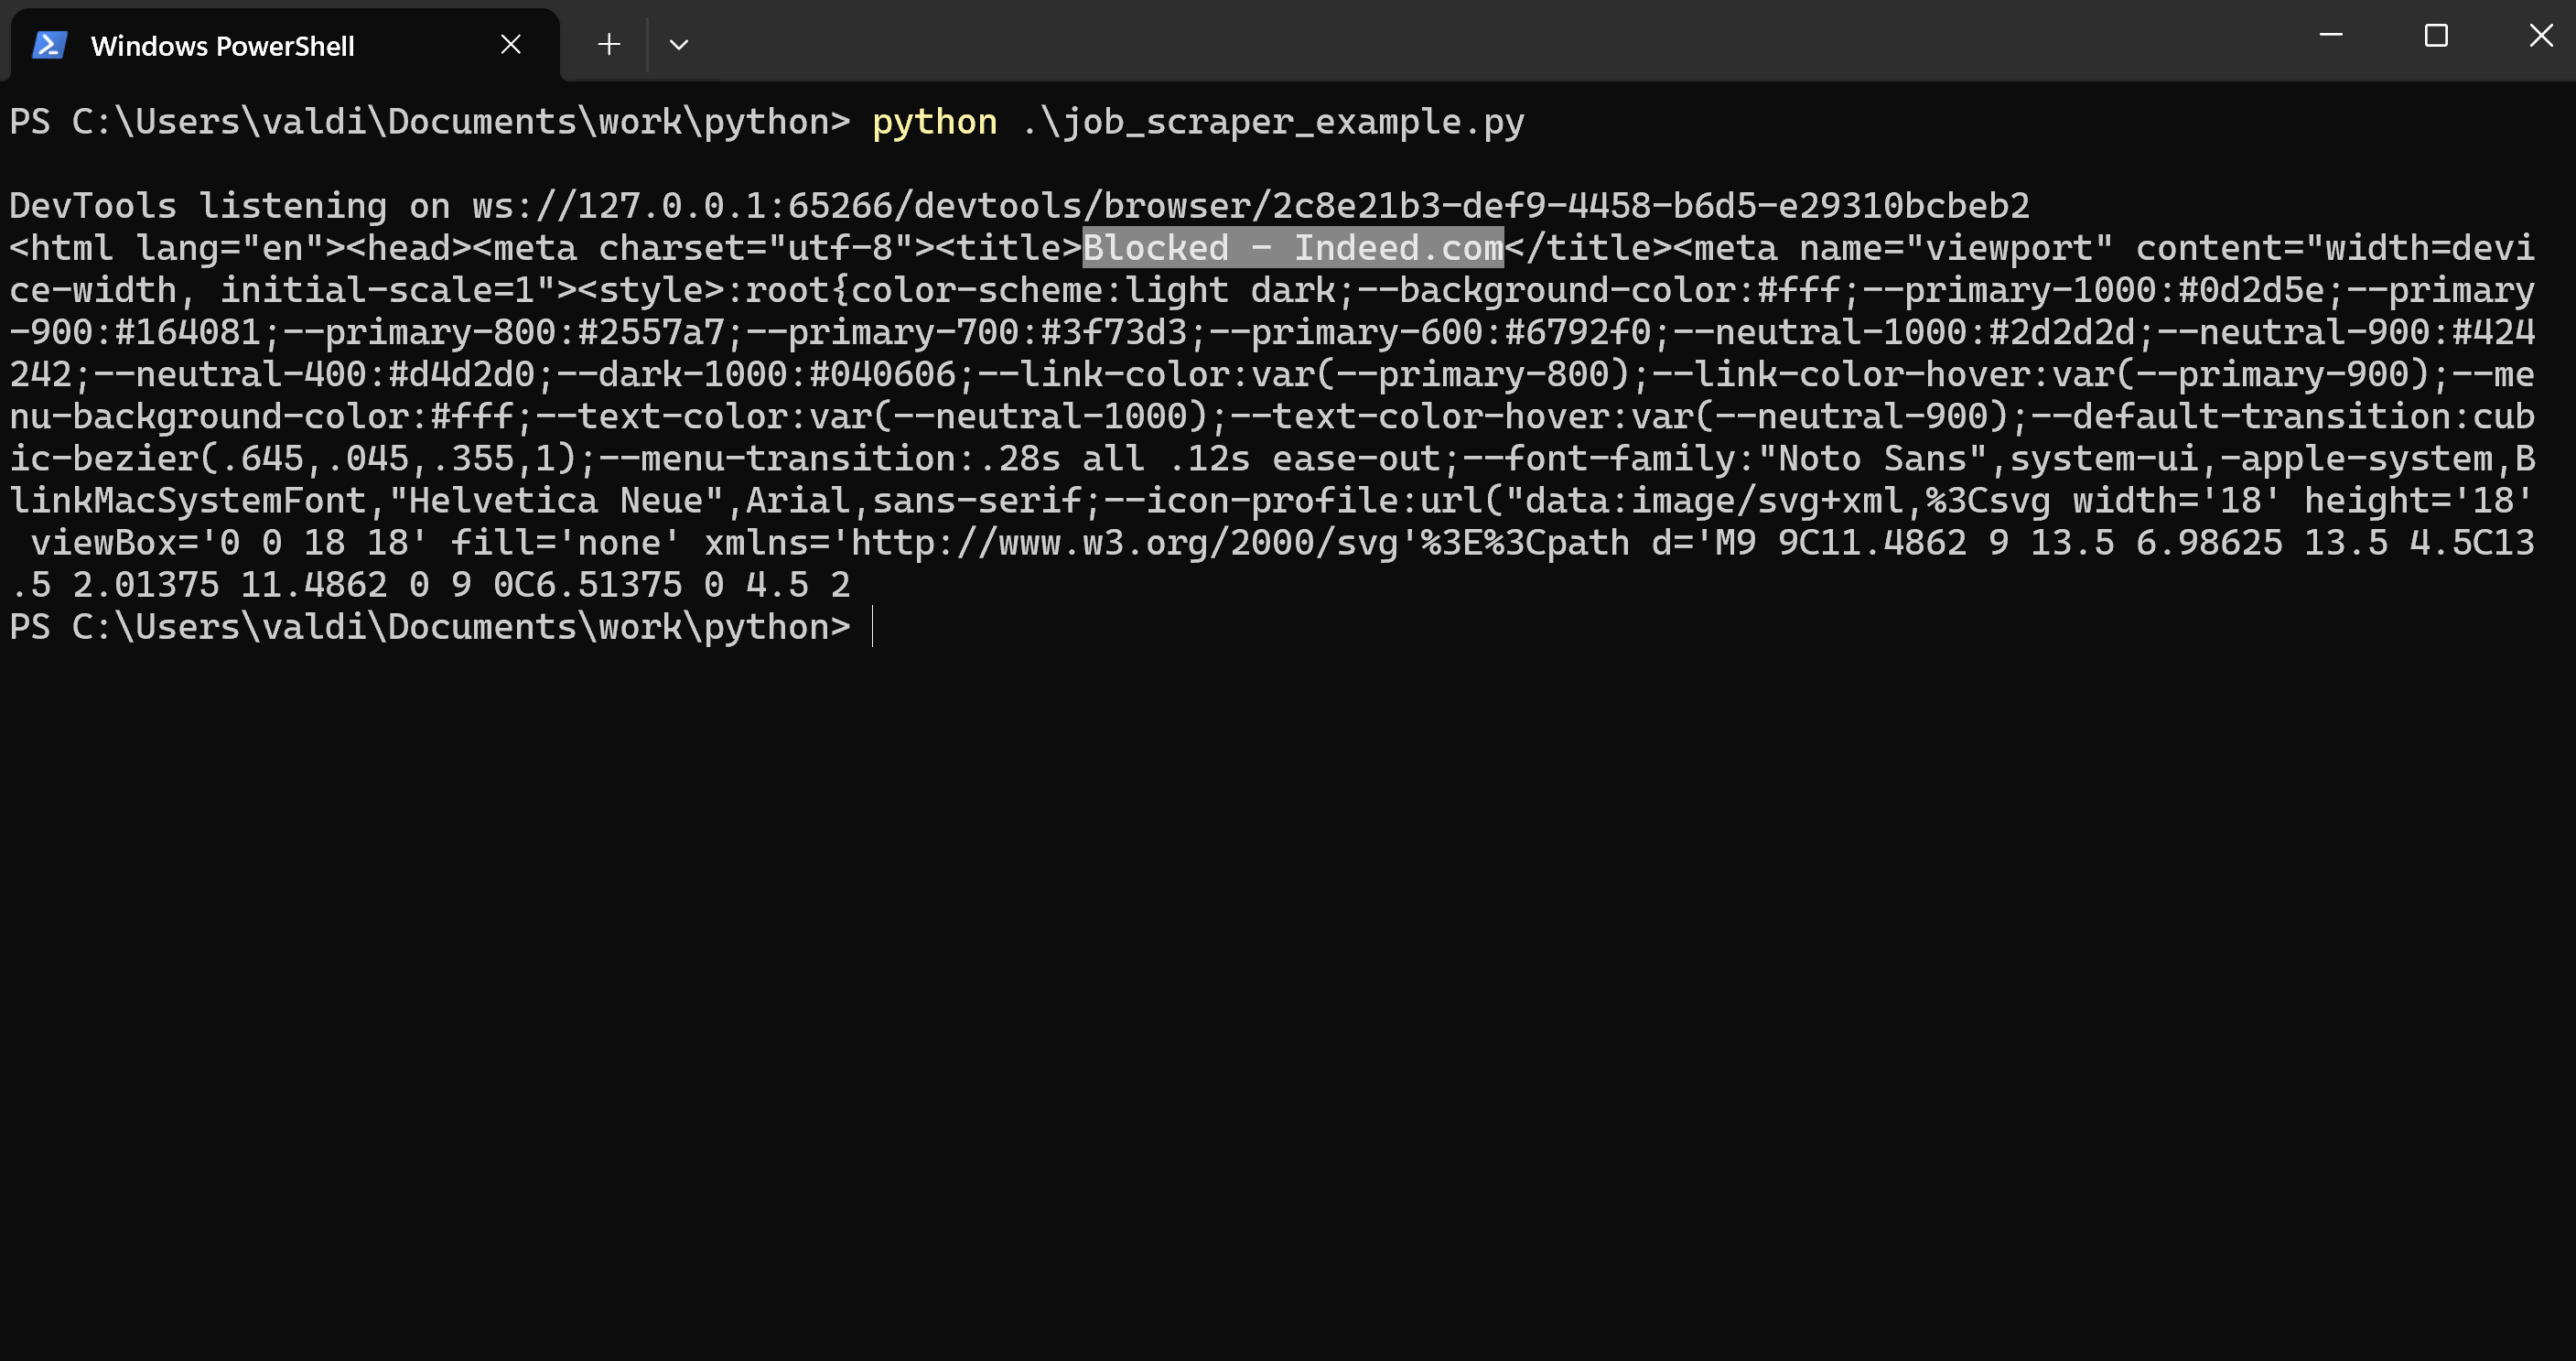
But if you look carefully at the output, you might realize that instead of having real jobs list, you're getting a blocked or security page from the job board. So this really is different from the earlier try with the Requests library, where you actually got a 403 Forbidden status code.
Instead of outright blocking the request with a 403 status code, this time, the website loads a security page or CAPTCHA, which means you’re still being blocked, just in a different way.
Why You’re Still Blocked ?
Welcome in the art of scraping job postings with python !
- Browser Fingerprinting: Websites could find out whether a browser was being operated with automation tools like Selenium.
- Headless Mode Detection: Running Chrome without a UI can help a website know there's automated activity going on.
3.5 Bypass Server Restrictions: Third Approach by Adding Headers to Selenium Options
Add more headers, such as User-Agent and Accept-Language, to make it appear more like an actual browser request.
chrome_options.add_argument("user-agent=Mozilla/5.0 (Windows NT 10.0; Win64; x64) AppleWebKit/537.36 (KHTML, like Gecko) Chrome/91.0.4472.124 Safari/537.36")
chrome_options.add_argument("accept-language=en-US,en;q=0.9")
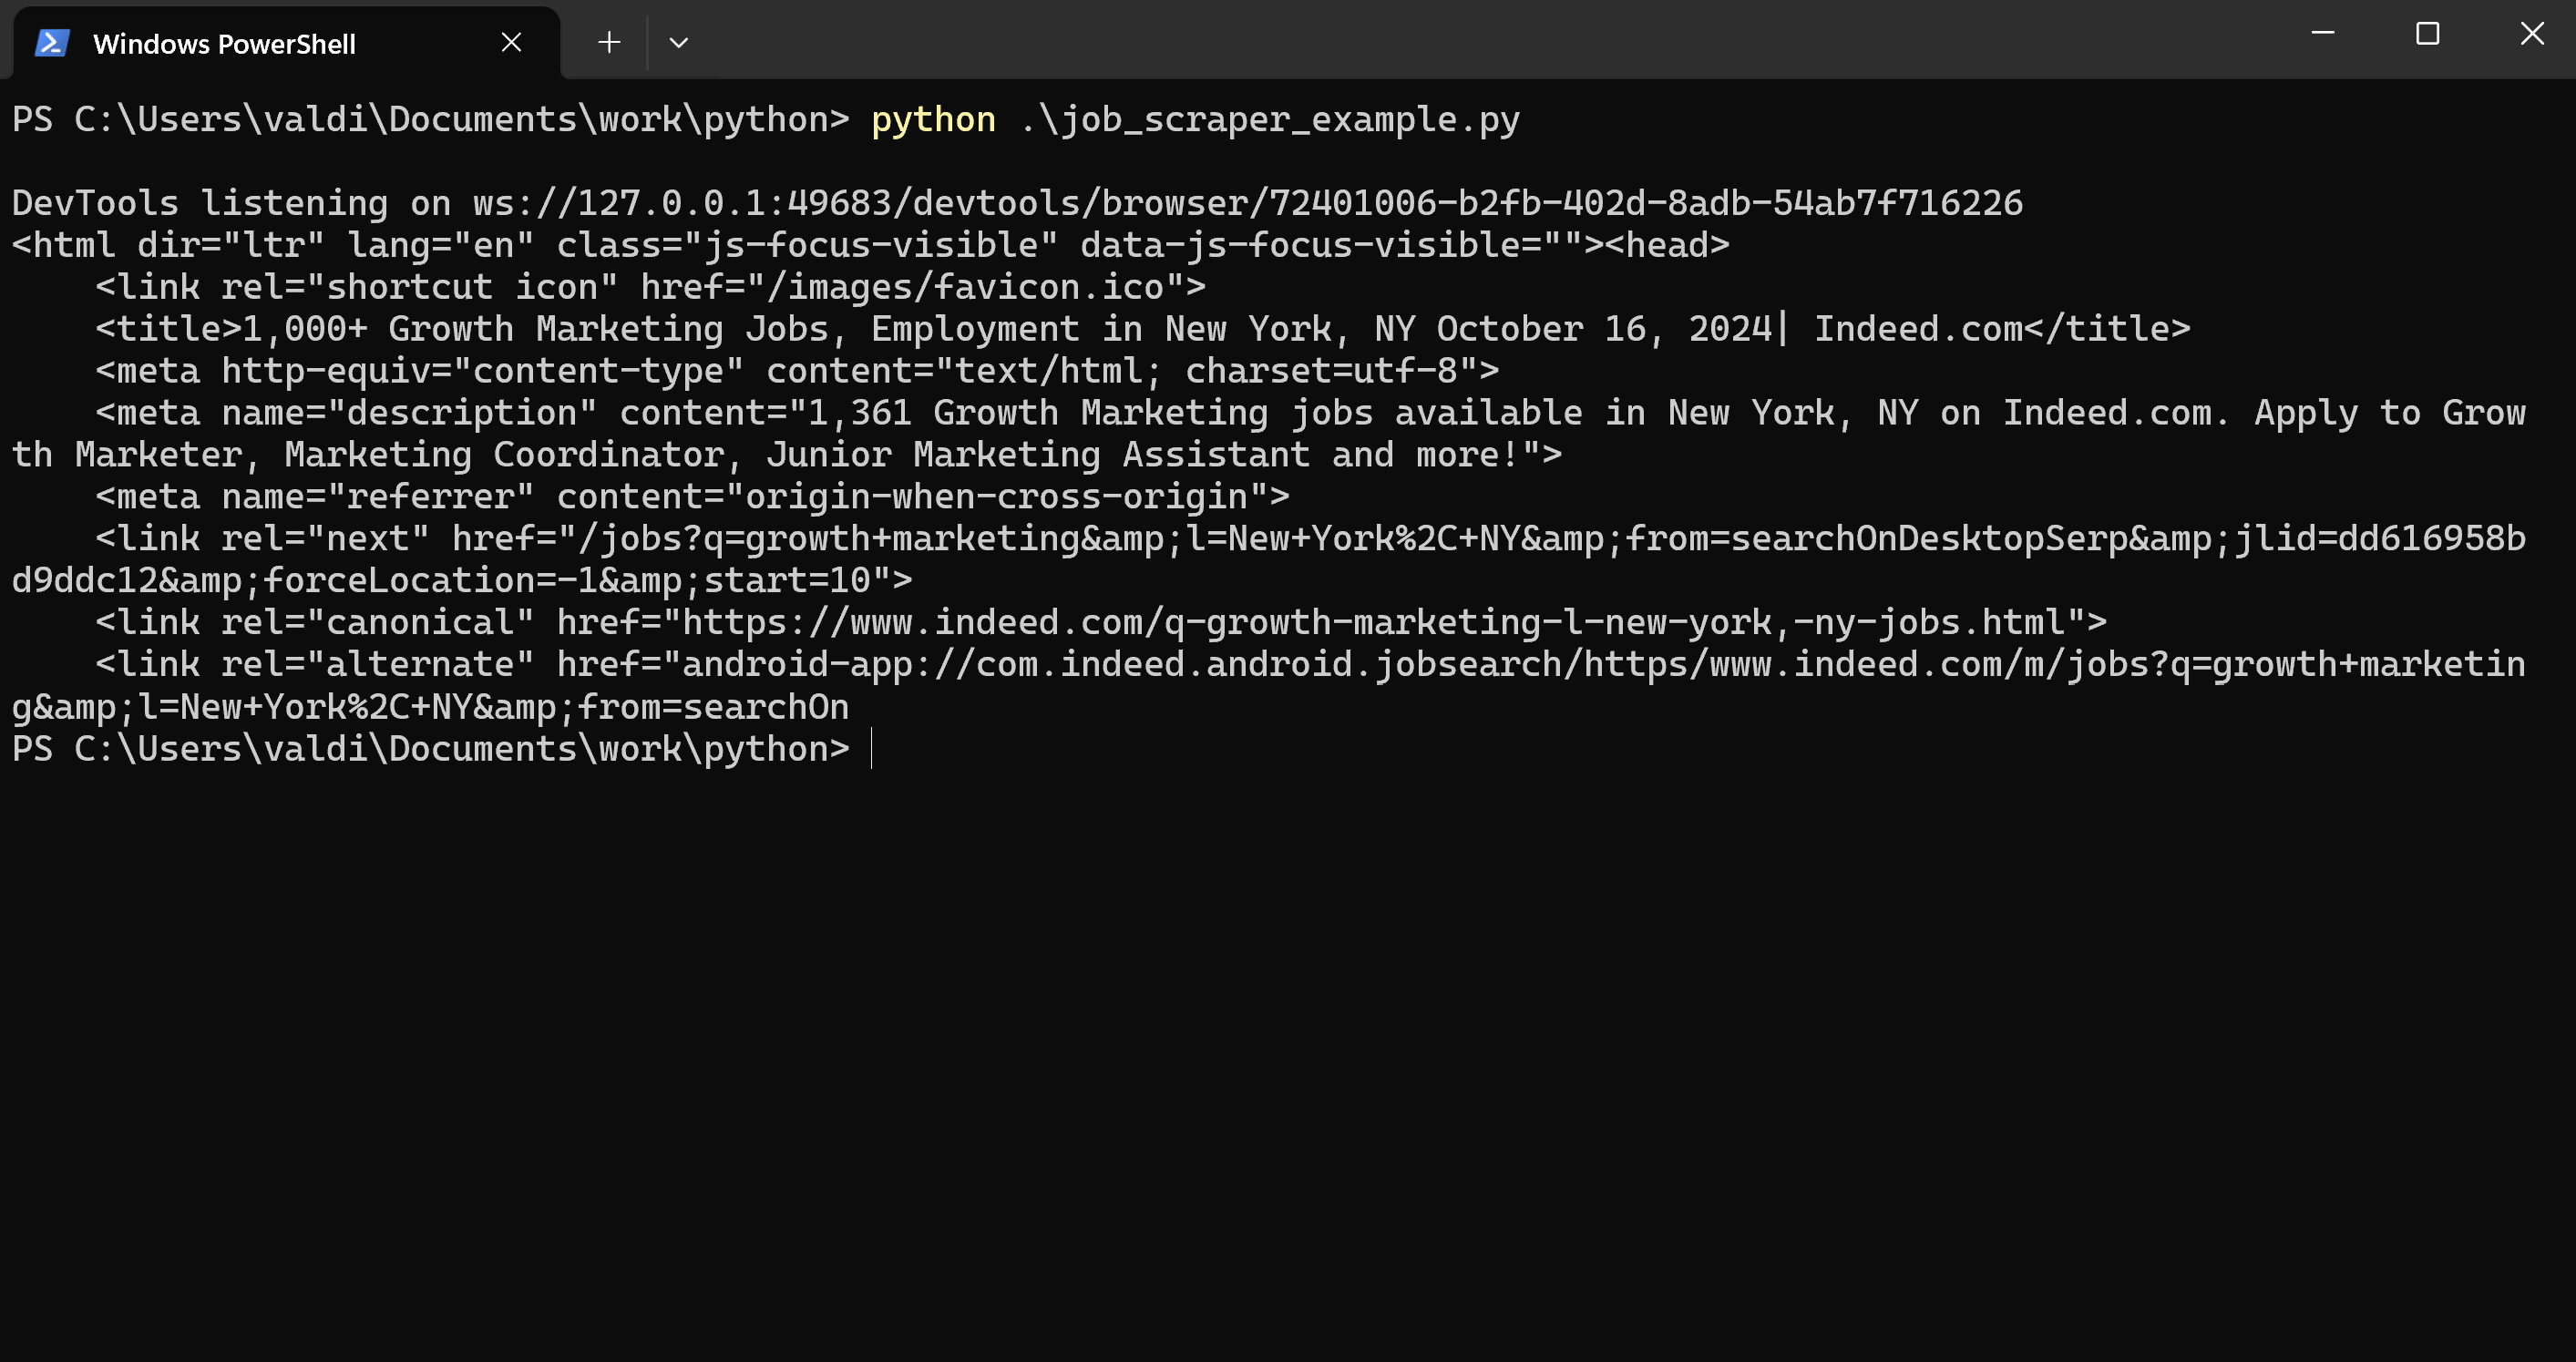
You can get through the first line of blocking tools for many job sites, such as Indeed or Monster, by adding the User-Agent and other headers to make it look like this is coming from a real browser.
Running your script again with headers should make you happy because you may actually retrieve the HTML page successfully. Which brings us to the cool part: moving on to the real task of extracting job data off the page.
3.6 Bypass Server Restrictions: What if You’re Still Blocked?
If adding the headers doesn’t work and you’re still getting blocked, another option is to remove the headless mode. By running Selenium in full browser mode, you’re less likely to be detected by websites that specifically block headless browsers.
Step 4: Reading HTML with BeautifulSoup
Now we have the HTML content through Selenium; it is time to read it and scrape the job data we want. This is where BeautifulSoup comes in useful.
4.1 Introduction to BeautifulSoup

BeautifulSoup is a Python library that makes it easier to navigate and search through an HTML structure. The library reads the HTML and offers tools that make it easier to narrow down to, for instance, tags, classes, or IDs, in order to locate specific items such as job titles, company names, or descriptions.
4.2 Getting Job Information from First Page
Once we have the HTML content of the page, we apply BeautifulSoup to locate and extract the exact parts containing the job information. For example, job titles can be held within elements like the <h2> or <h3> tag with specific classes. We will be finding these using those tags and classes and extracting this important data.
4.2.1 Code Example: Getting Job Titles
Here is a simple way to get job titles from the HTML content:
from bs4 import BeautifulSoup

# Parse the HTML content using BeautifulSoup
soup = BeautifulSoup(page_source, 'html.parser')

# Find all job titles (adjust the tag and class based on the site structure)
job_titles = soup.find_all('h2', class_='jobTitle')

# Loop through the job titles and print them
for job in job_titles:
    print(job.get_text().strip())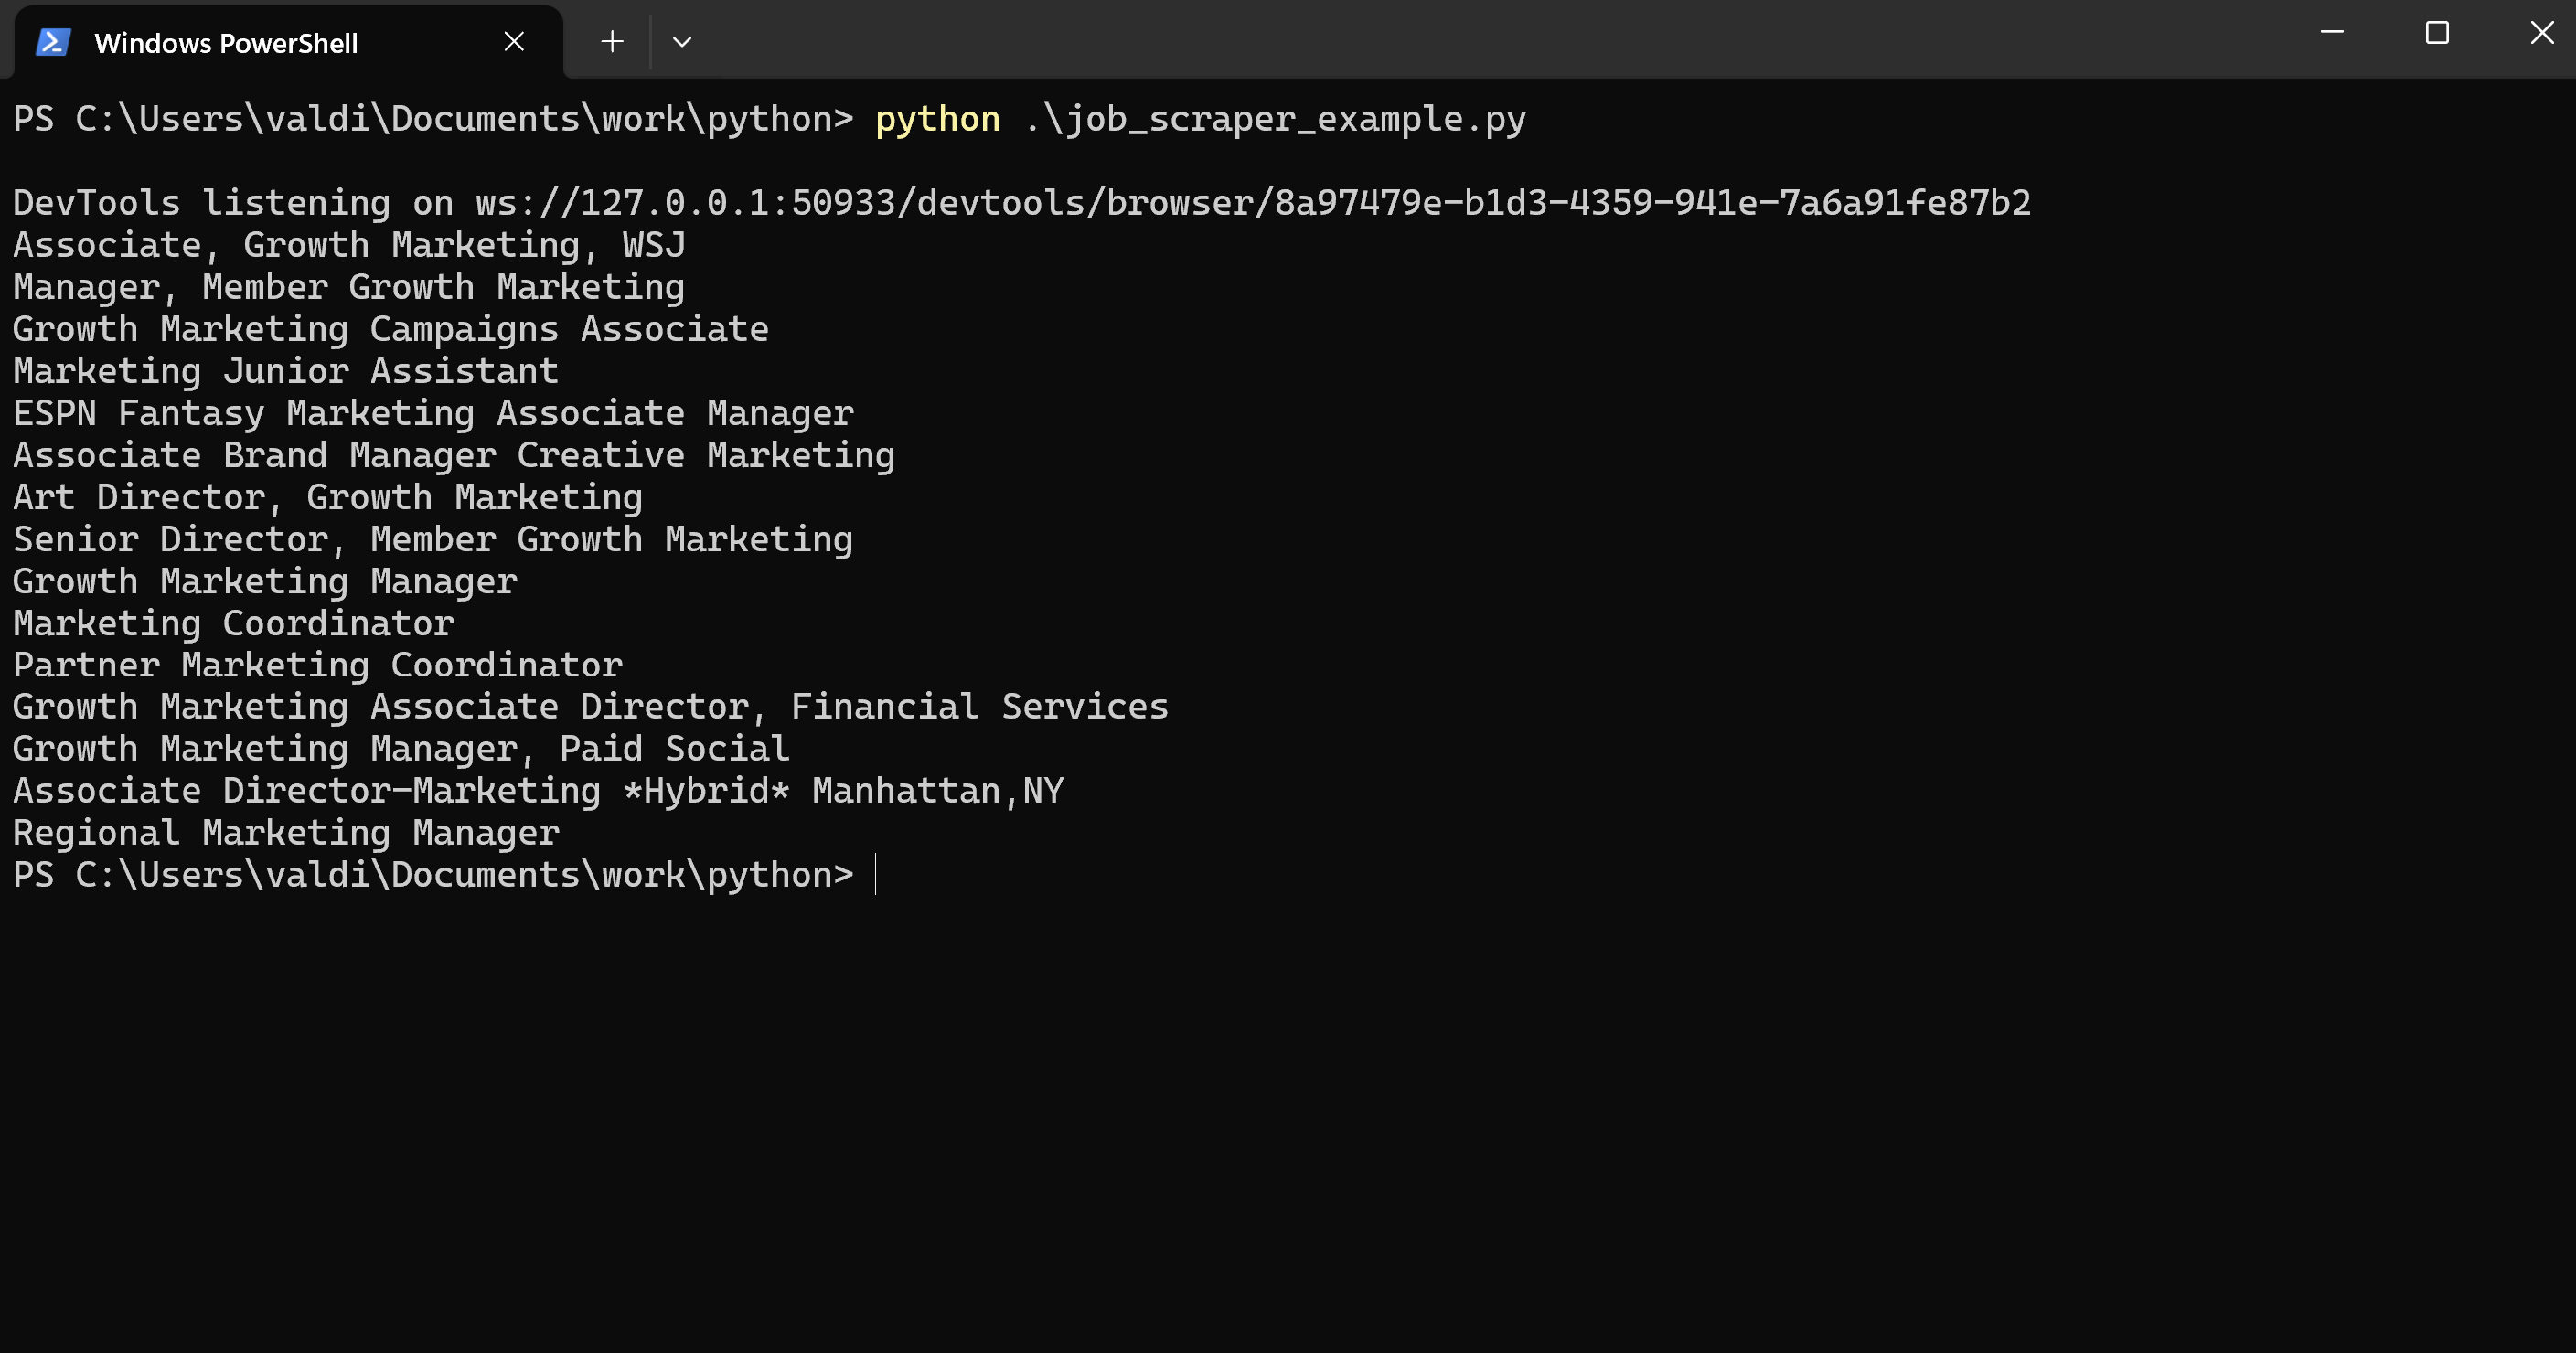
In this step we got a list of 15 job titles from the HTML page. Indeed shows 15 job listings per page. But we want to scrape many job titles, not just the first 15. For this, we need to handle pagination so that we can go through many pages of job listing.
But let me first get more information from this first page, like company names, job description, locations, and needed skills.To get that information, one has to look at the structure in HTML and find out where that information is stored.
Remember Step 2.2?
4.2.2 Code Example: Extracting Company Names
Company names are often stored in different HTML elements, such as or tags, with a specific class.
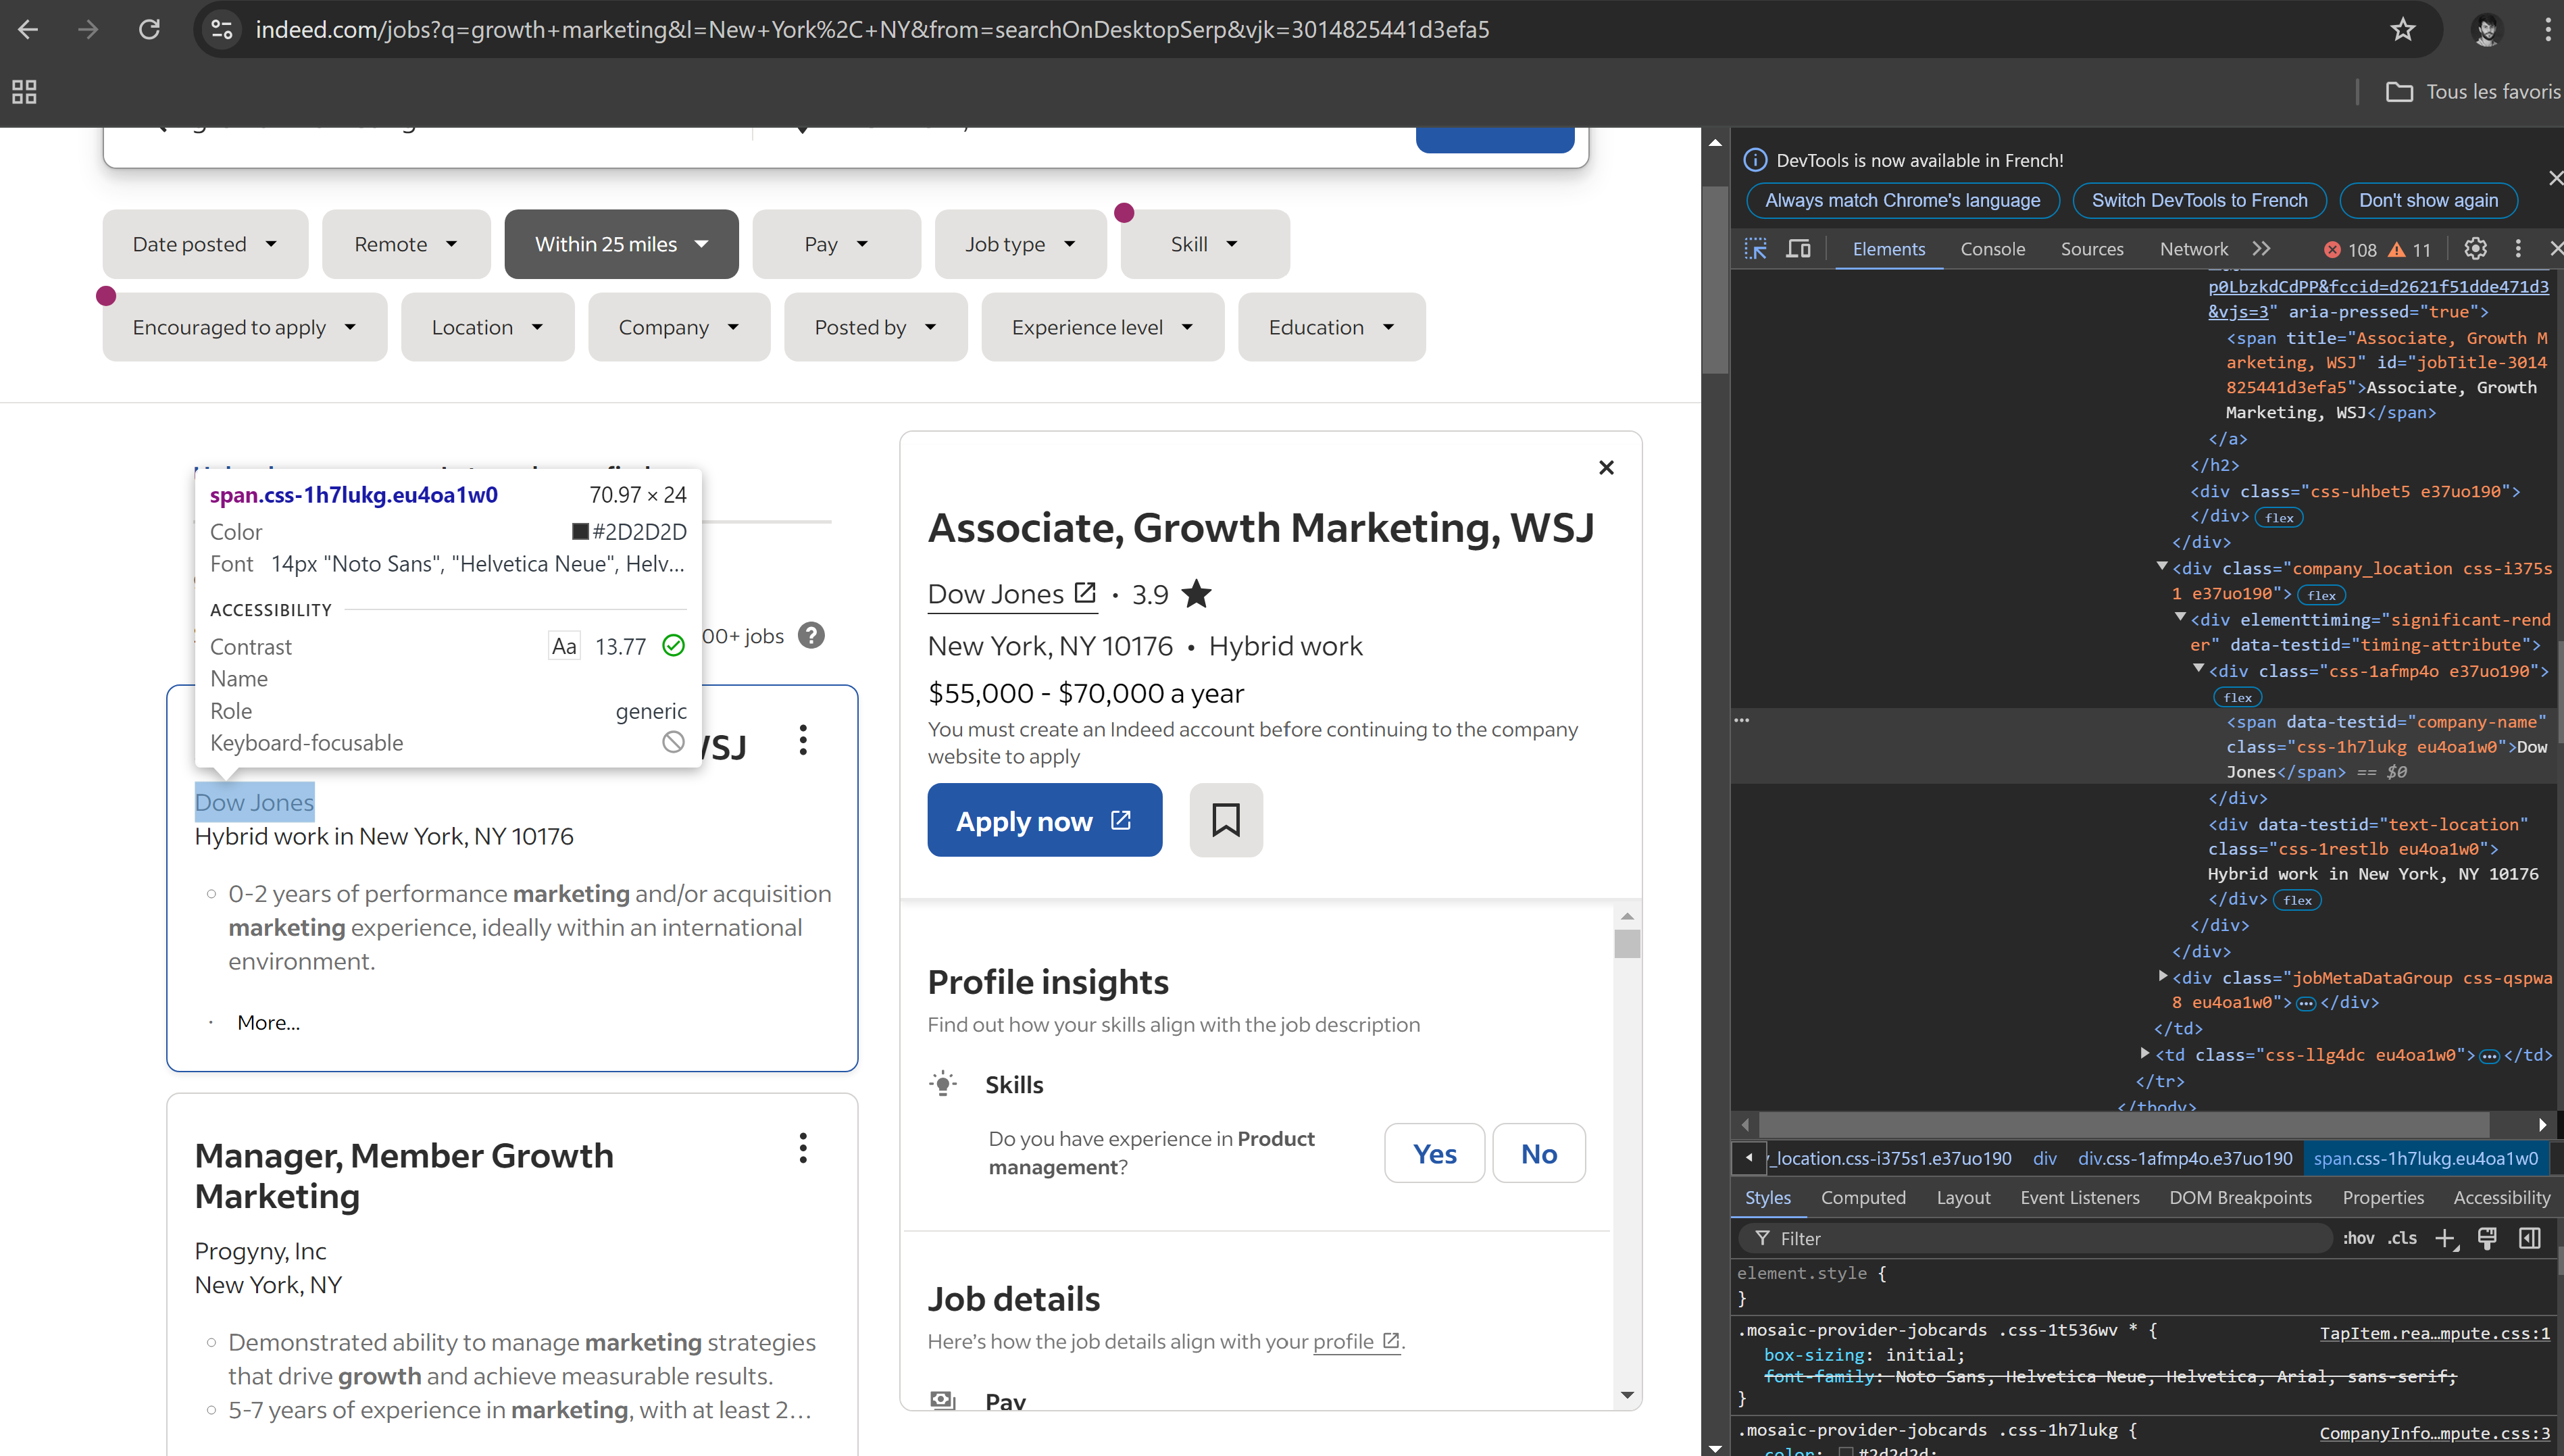
Here is the html containing the company name :
<div class="css-1afmp4o e37uo190"><span data-testid="company-name" class="css-1h7lukg eu4oa1w0">Dow Jones</span></div>The css class name css-1afmp4o e37uo190 seems to be random. Class names can change frequently on websites like Indeed, so it's better to use the data-testid attribute to target the company names, as it's more stable.
# Extract company names using the data-testid attribute
company_names = soup.find_all('span', {'data-testid': 'company-name'})

# Loop through and print company names
for company in company_names:
    print(company.get_text().strip())
4.2.3 Code Example: Extracting Job Location
At this step, you should know how to collect Job location :
# Extract locations using the data-testid attribute
locations = soup.find_all('div', {'data-testid': 'text-location'})

# Loop through and print company names
for location in locations:
    print(location.get_text().strip())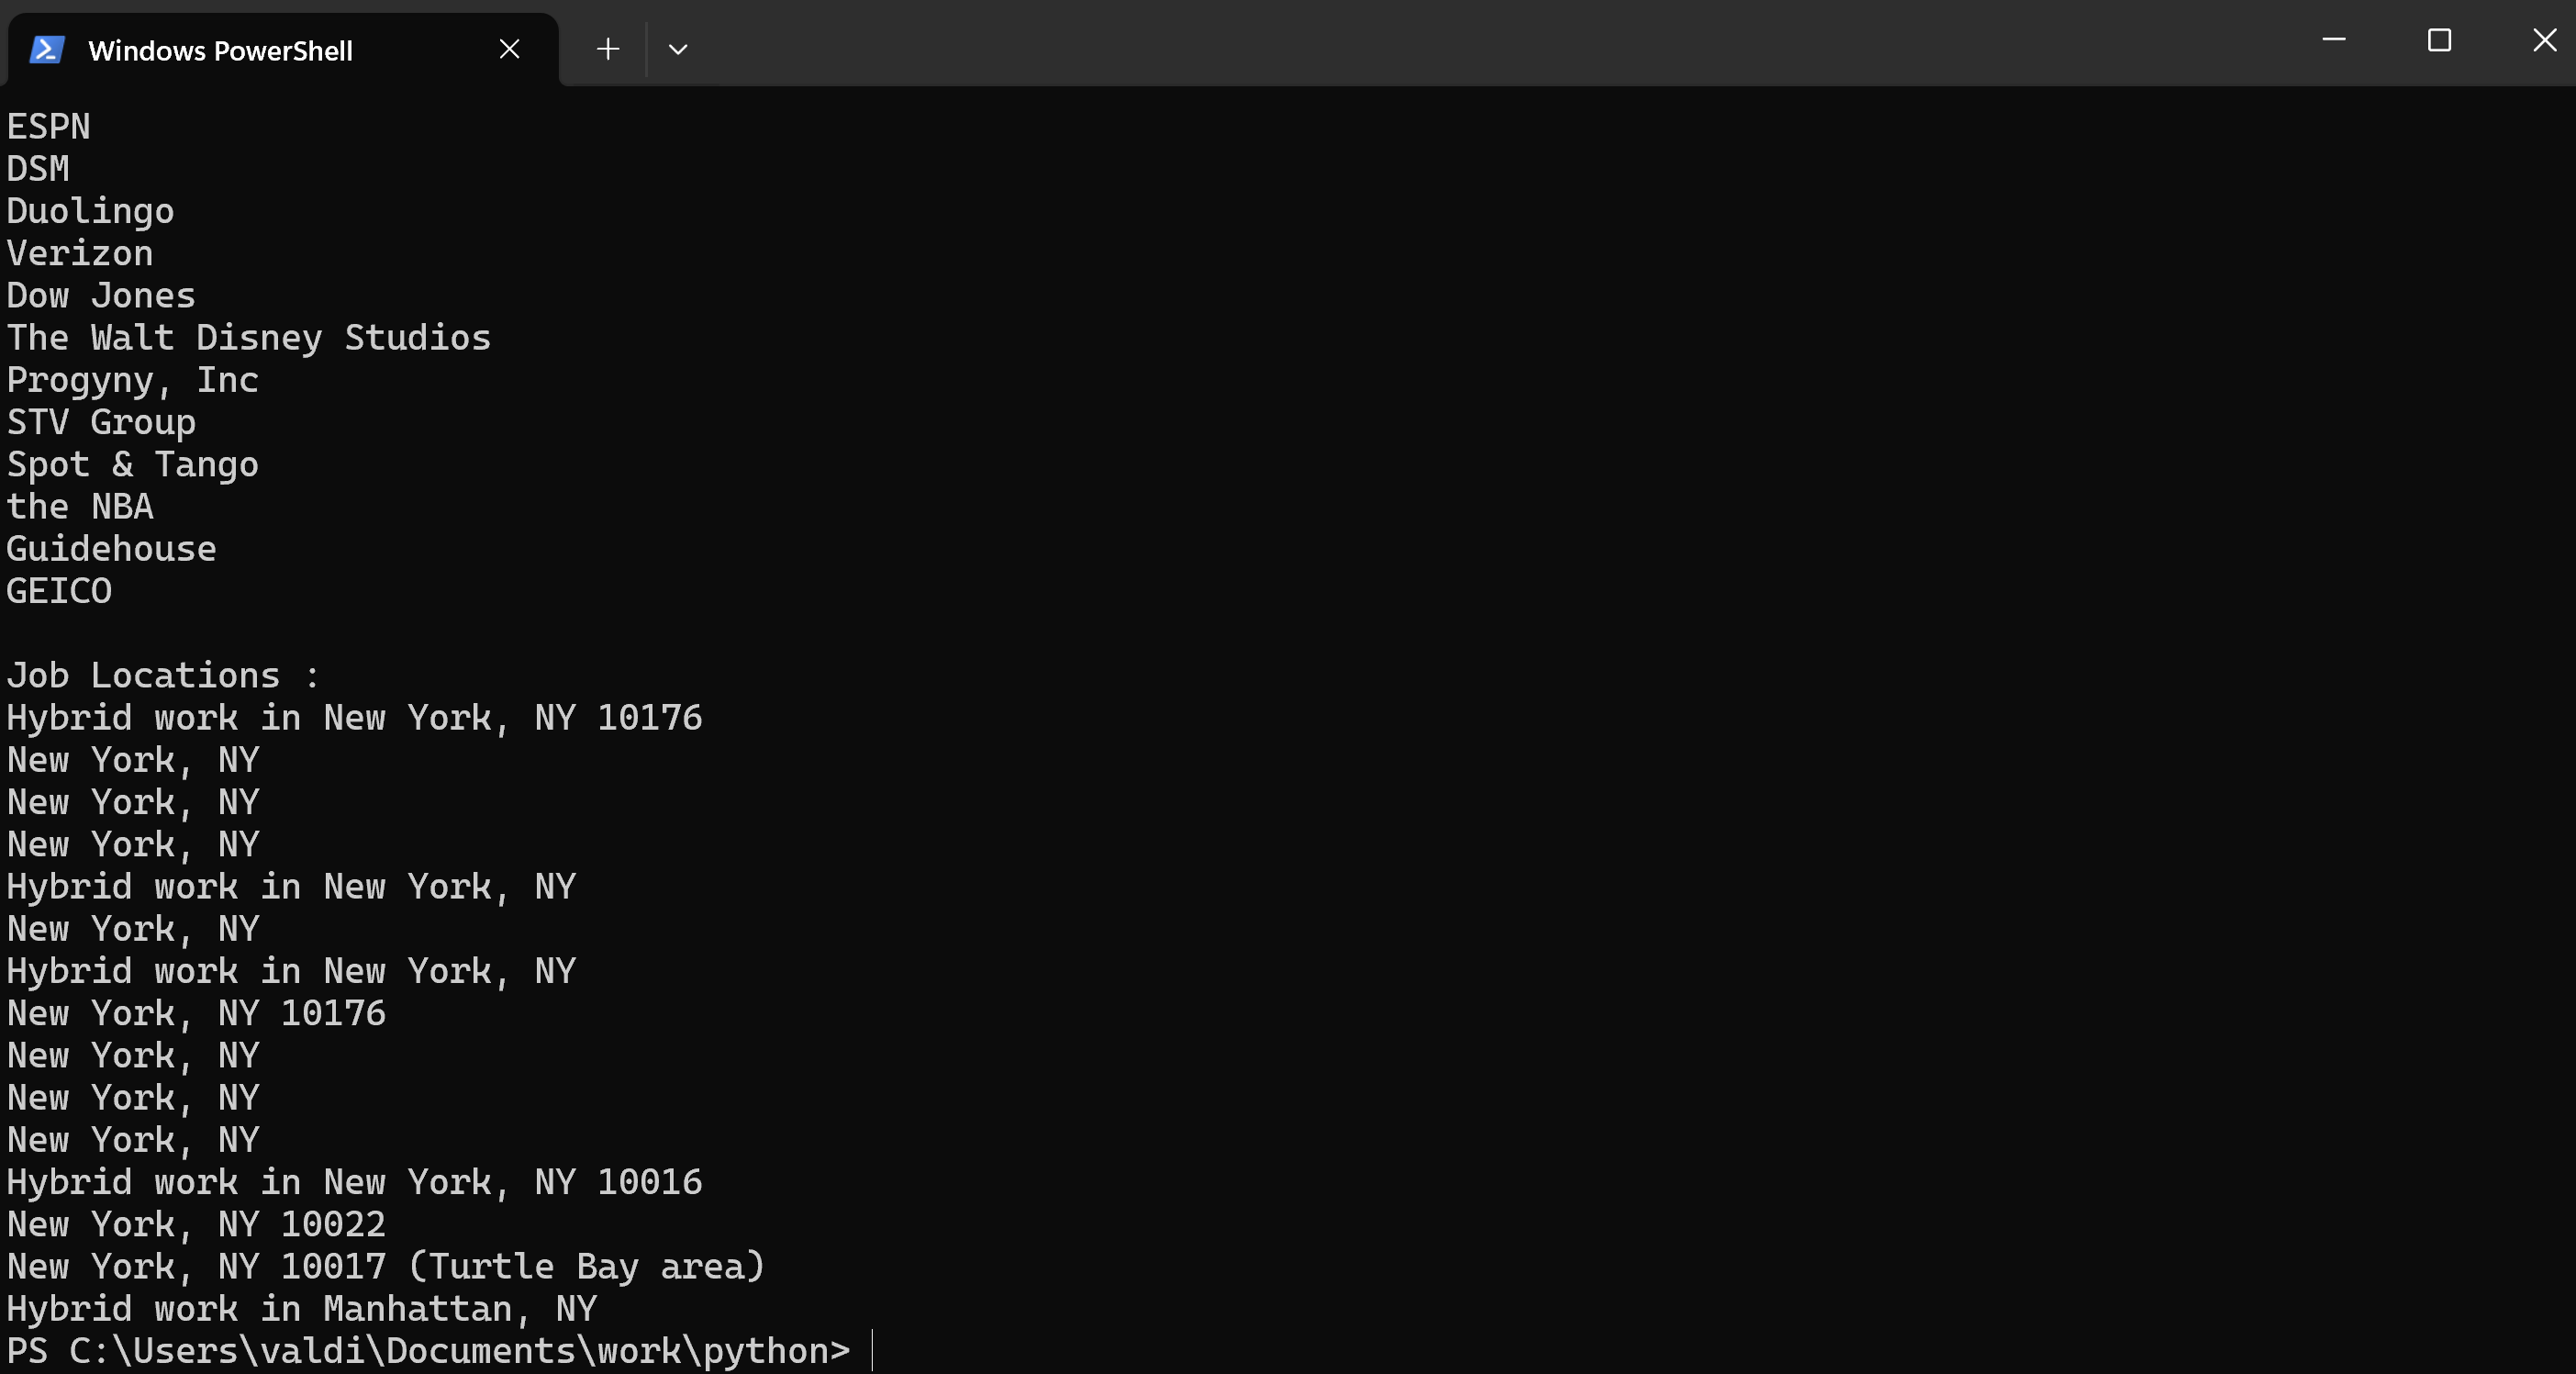
4.3 Extracting Job Salary and other datas available only on the Job Posting Detailed
The salary information is only available on the job detail page, and probably loaded using AJAX. To get the salaries, you will need to access each job listing to get the detailed data. Since the salary doesn't appear in the list view, we can automate the following process:
1 ) Scrape job links from the main listing page.
2) Navigate to Each Job URL using Selenium to access the job detail page.
3) Grab the salary information from the job detail page.
Here's one way to get this:
4.3.1 Get the Job URLs
Most vacancy announcements have links to a full job description page. You should be able to find the URL of such pages on the main listings page; most of these links are inside <a> tags in the job title, or something similar.
In any of the listing pages, if the mouse hovers over the job title, the title becomes underlined. That forms the impression that it is a clickable link and will probably open to the job details page.
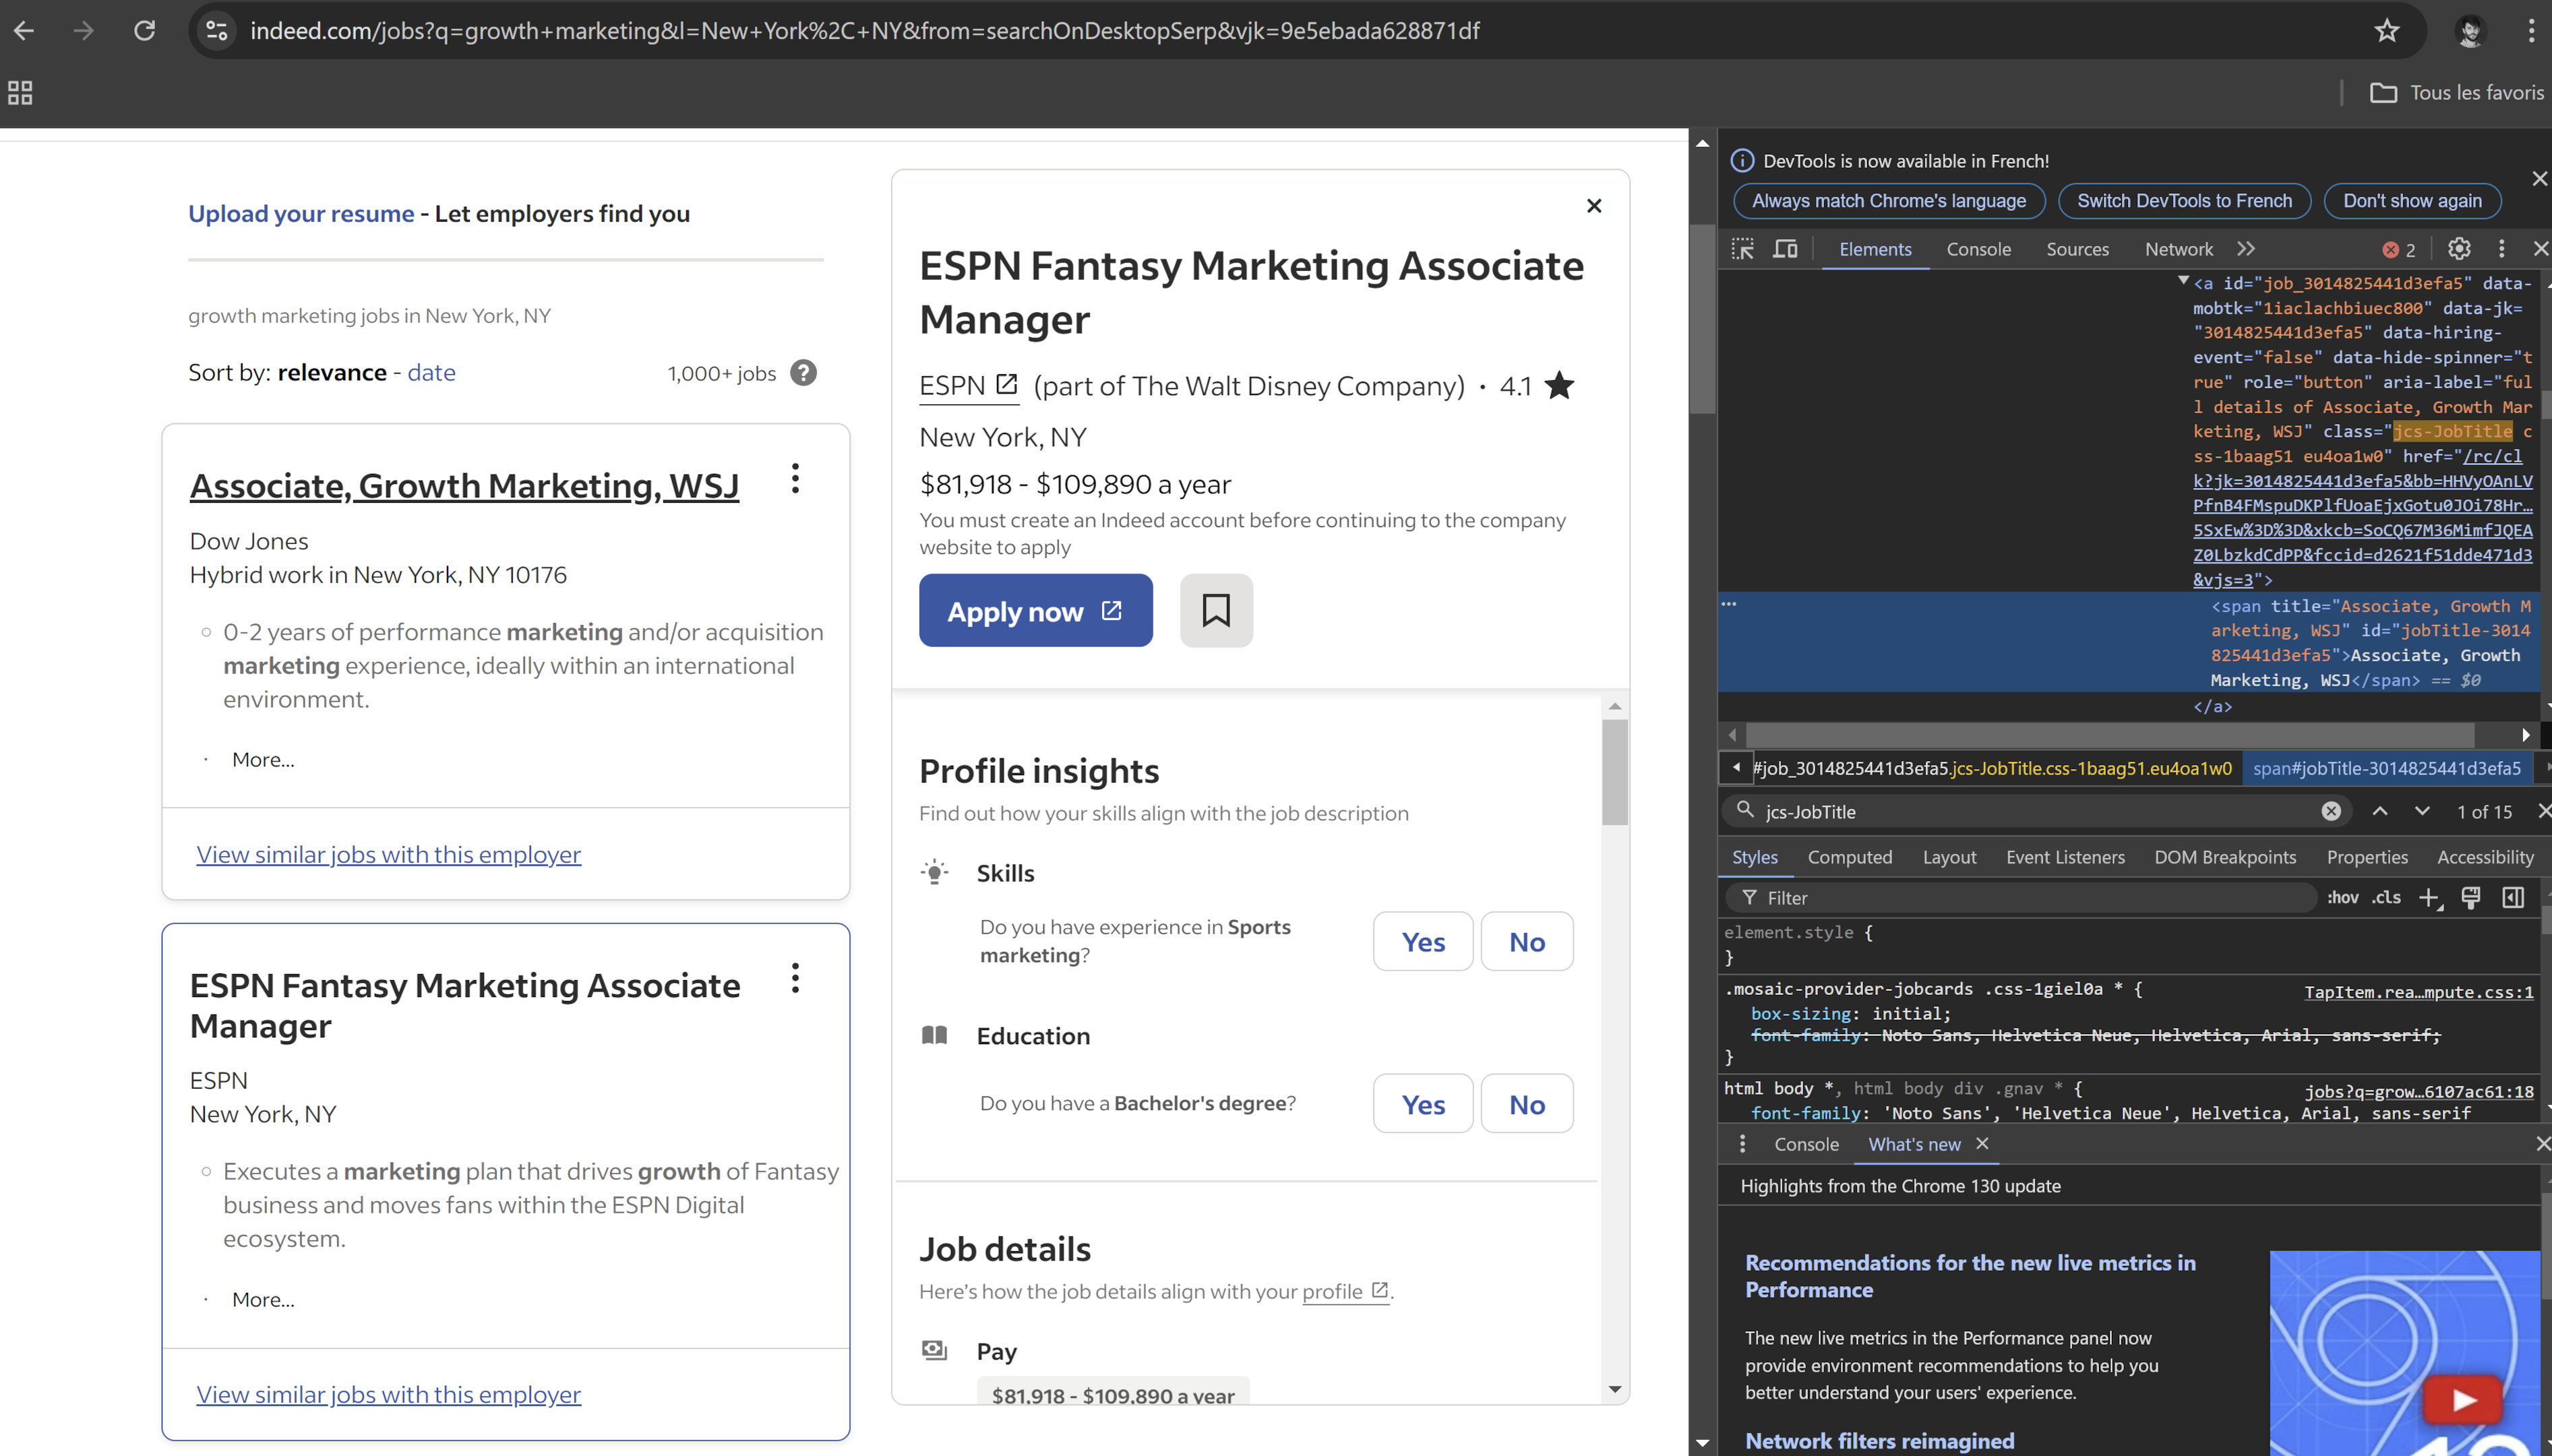
And indeed, if clicked, the title opens the full job posting. Here is the finded html :
<h2 class="jobTitle css-1psdjh5 eu4oa1w0" tabindex="-1">
<a id="job_9e5ebada628871df" data-mobtk="1iaclachbiuec800" data-jk="9e5ebada628871df" role="button" aria-label="full details of ESPN Fantasy Marketing Associate Manager" class="jcs-JobTitle css-1baag51 eu4oa1w0" href="/rc/clk?jk=9e5ebada628871df&bb=HHVyOAnLVPfnB4FMspuDKGGQI1GZxxUdZbVjr7A2vBF1EwgmhviNDlt1UJiNBdYucm3Jr5BkX3vtDhsGz1foSJmZVK3VvcO6VoosRWxIomzTsiADNMX66pB73X3-5Qdr&xkcb=SoAk67M36MimfJQEAZ0KbzkdCdPP&fccid=6eef86842cab8b5a&vjs=3">
<span title="ESPN Fantasy Marketing Associate Manager" id="jobTitle-9e5ebada628871df">ESPN Fantasy Marketing Associate Manager</span>
</a>
</h2>The link itself has the class "jcs-JobTitle", which can be used to target and extract the job URLs. We can now use BeautifulSoup to extract all job links and proceed to extract data.
# Extract job URLs from the main listing page
job_links = soup.find_all('a', class_='jcs-JobTitle')

job_urls = []
base_url = 'https://www.indeed.com'  # Base URL for Indeed

# Loop through the job links and extract the href attribute
for link in job_links:
    href = link.get('href')
    if href:
        full_url = base_url + href
        job_urls.append(full_url)

# Print extracted job URLs
for url in job_urls:
    print(url)
Since the href attribute contains a relative path (e.g., "/rc/clk?jk=9e5ebada628871df..."), we need to prepend the base URL (https://www.indeed.com) to create the full URL.
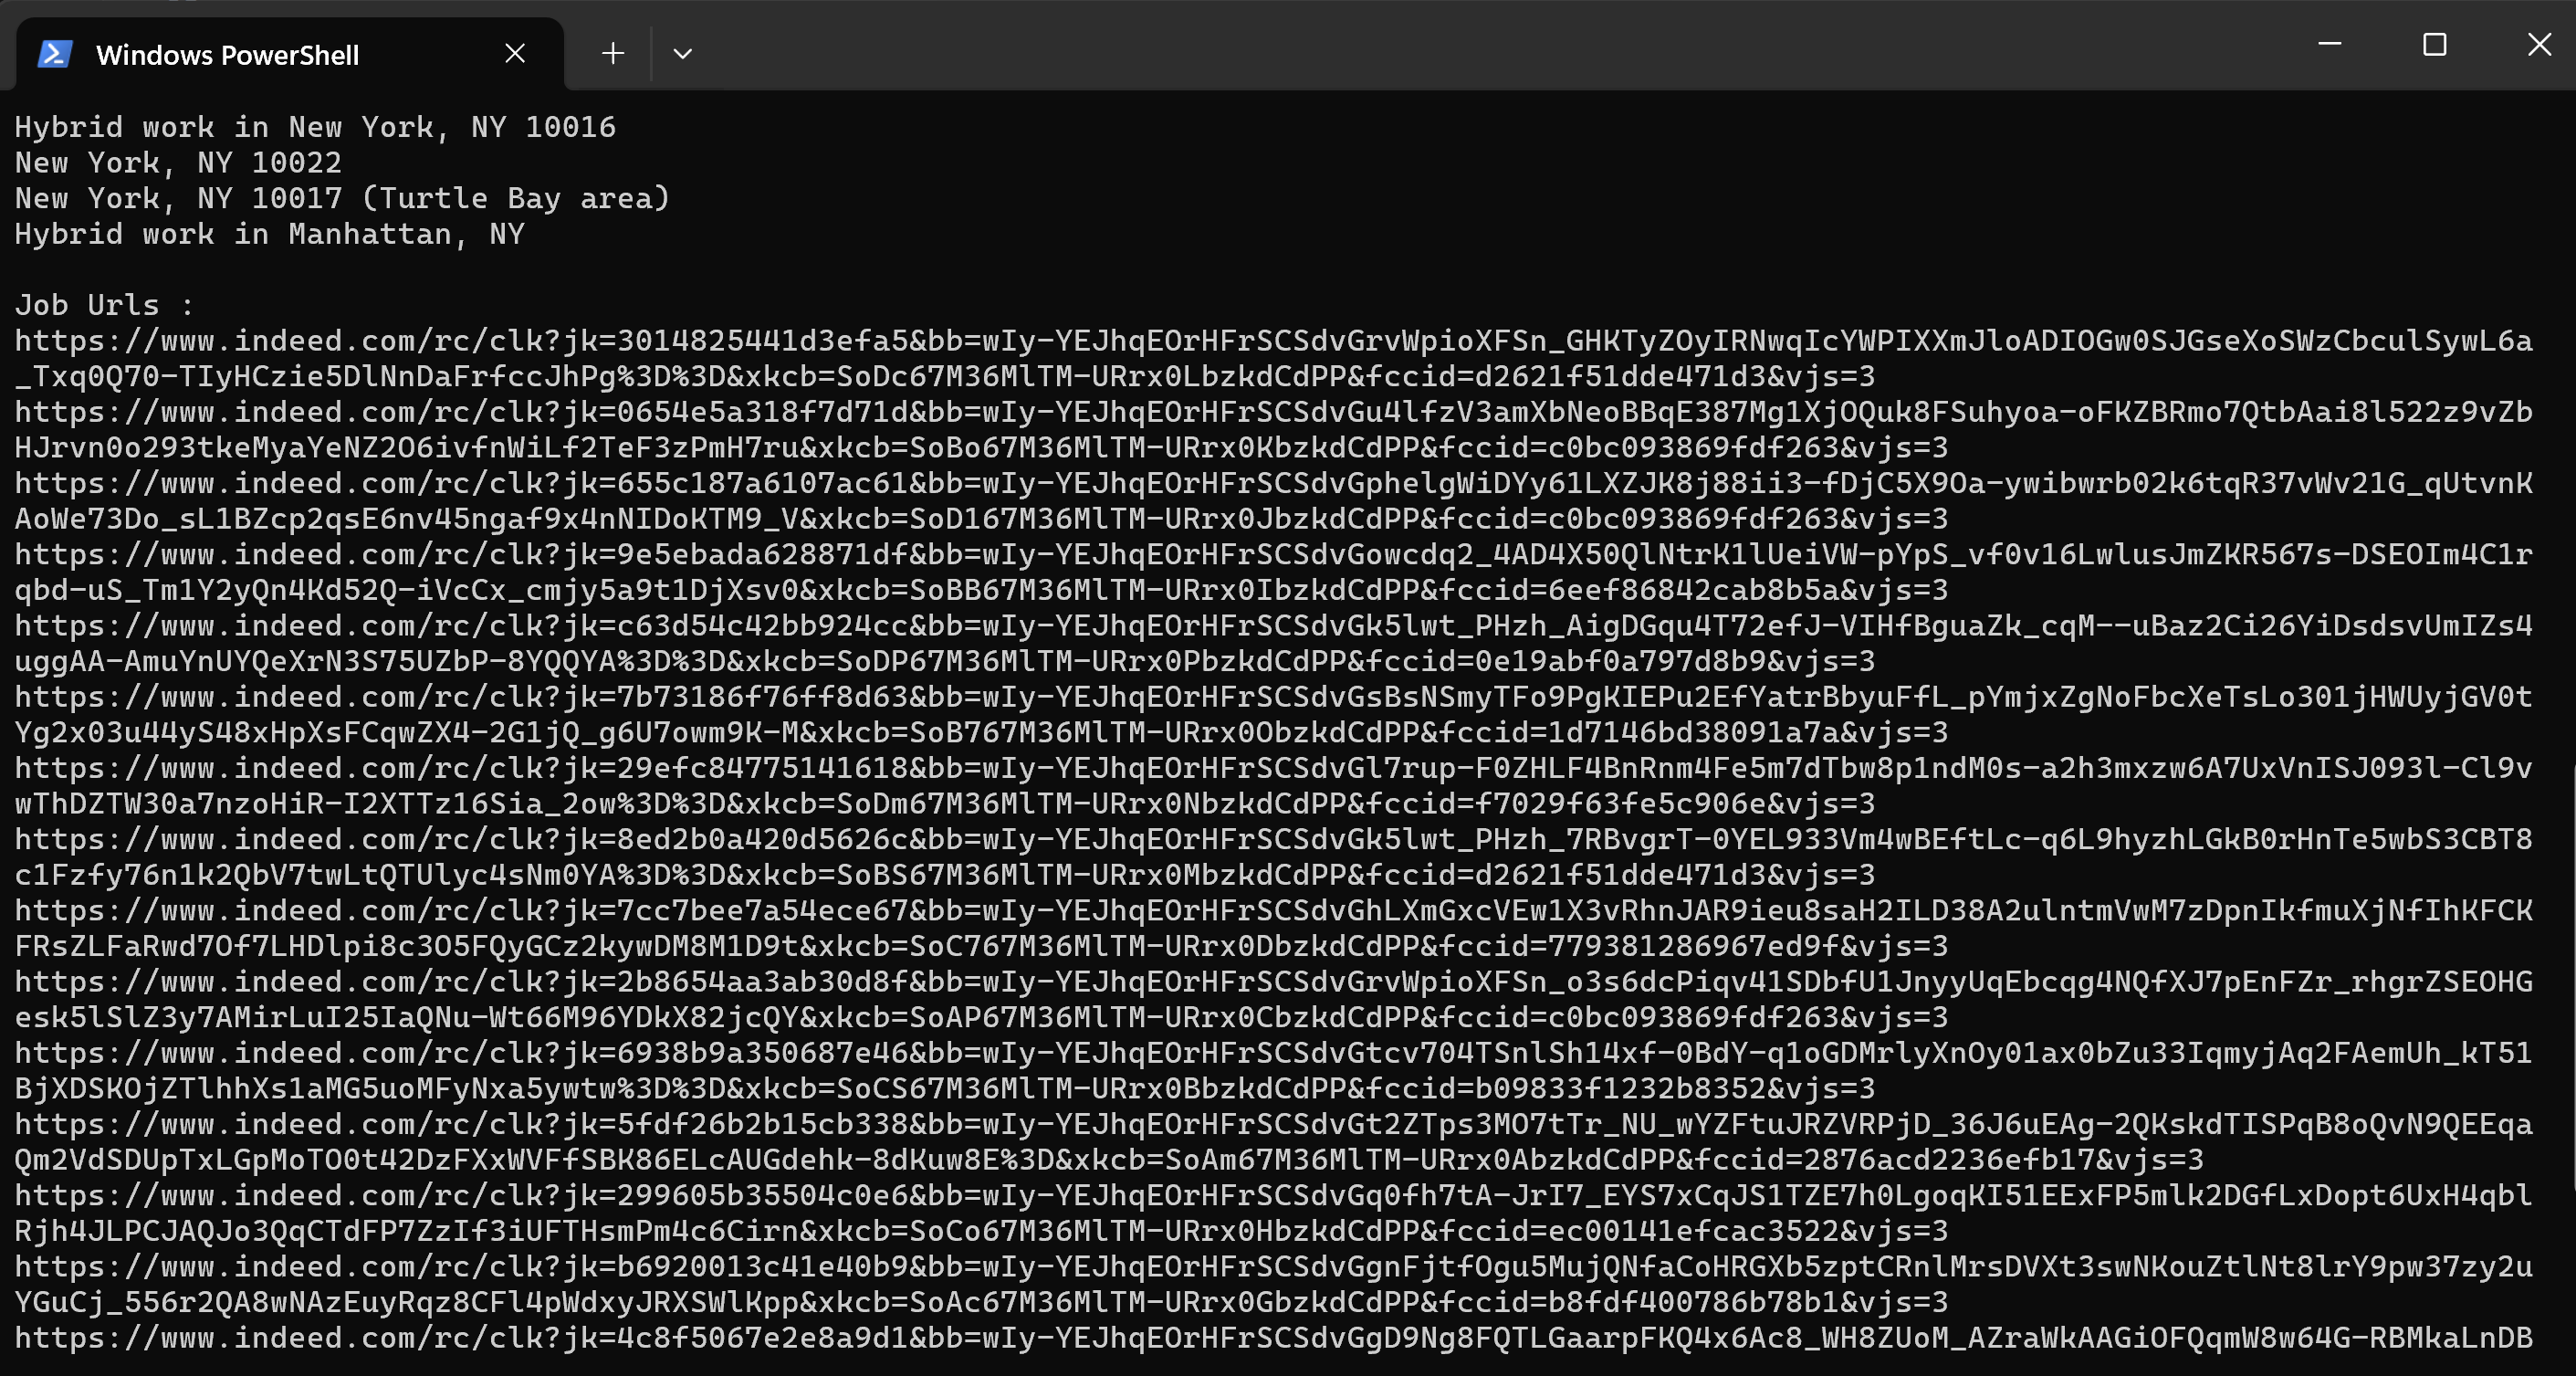
4.3.2 Visit Each Job URL and Scrape the Details of Job Salaries
After fetching job URLs, you can iterate through them. Using Selenium, open the page and scrape the salary information that is probably loaded using AJAX on the job detail page.
Here is a simple way to do it:
for job_url in job_urls:
    # Open the job detail page
    driver.get(job_url)
    time.sleep(5)  # Adjust the sleep time to allow the page to load

    # Get the updated page source after loading the job detail page
    job_detail_page_source = driver.page_source
    job_soup = BeautifulSoup(job_detail_page_source, 'html.parser')

    # Extract salary (you'll need to inspect the job detail page to get the exact tag and class)
    salary = job_soup.find('div', id='salaryInfoAndJobType')  # Adjust the class or tag as needed
    if salary:
        print(f"Salary for {job_url}: {salary.get_text().strip()}")
    else:
        print(f"No salary listed for {job_url}")
Sometimes, job postings include salary information within the description when there is no separate salary field.
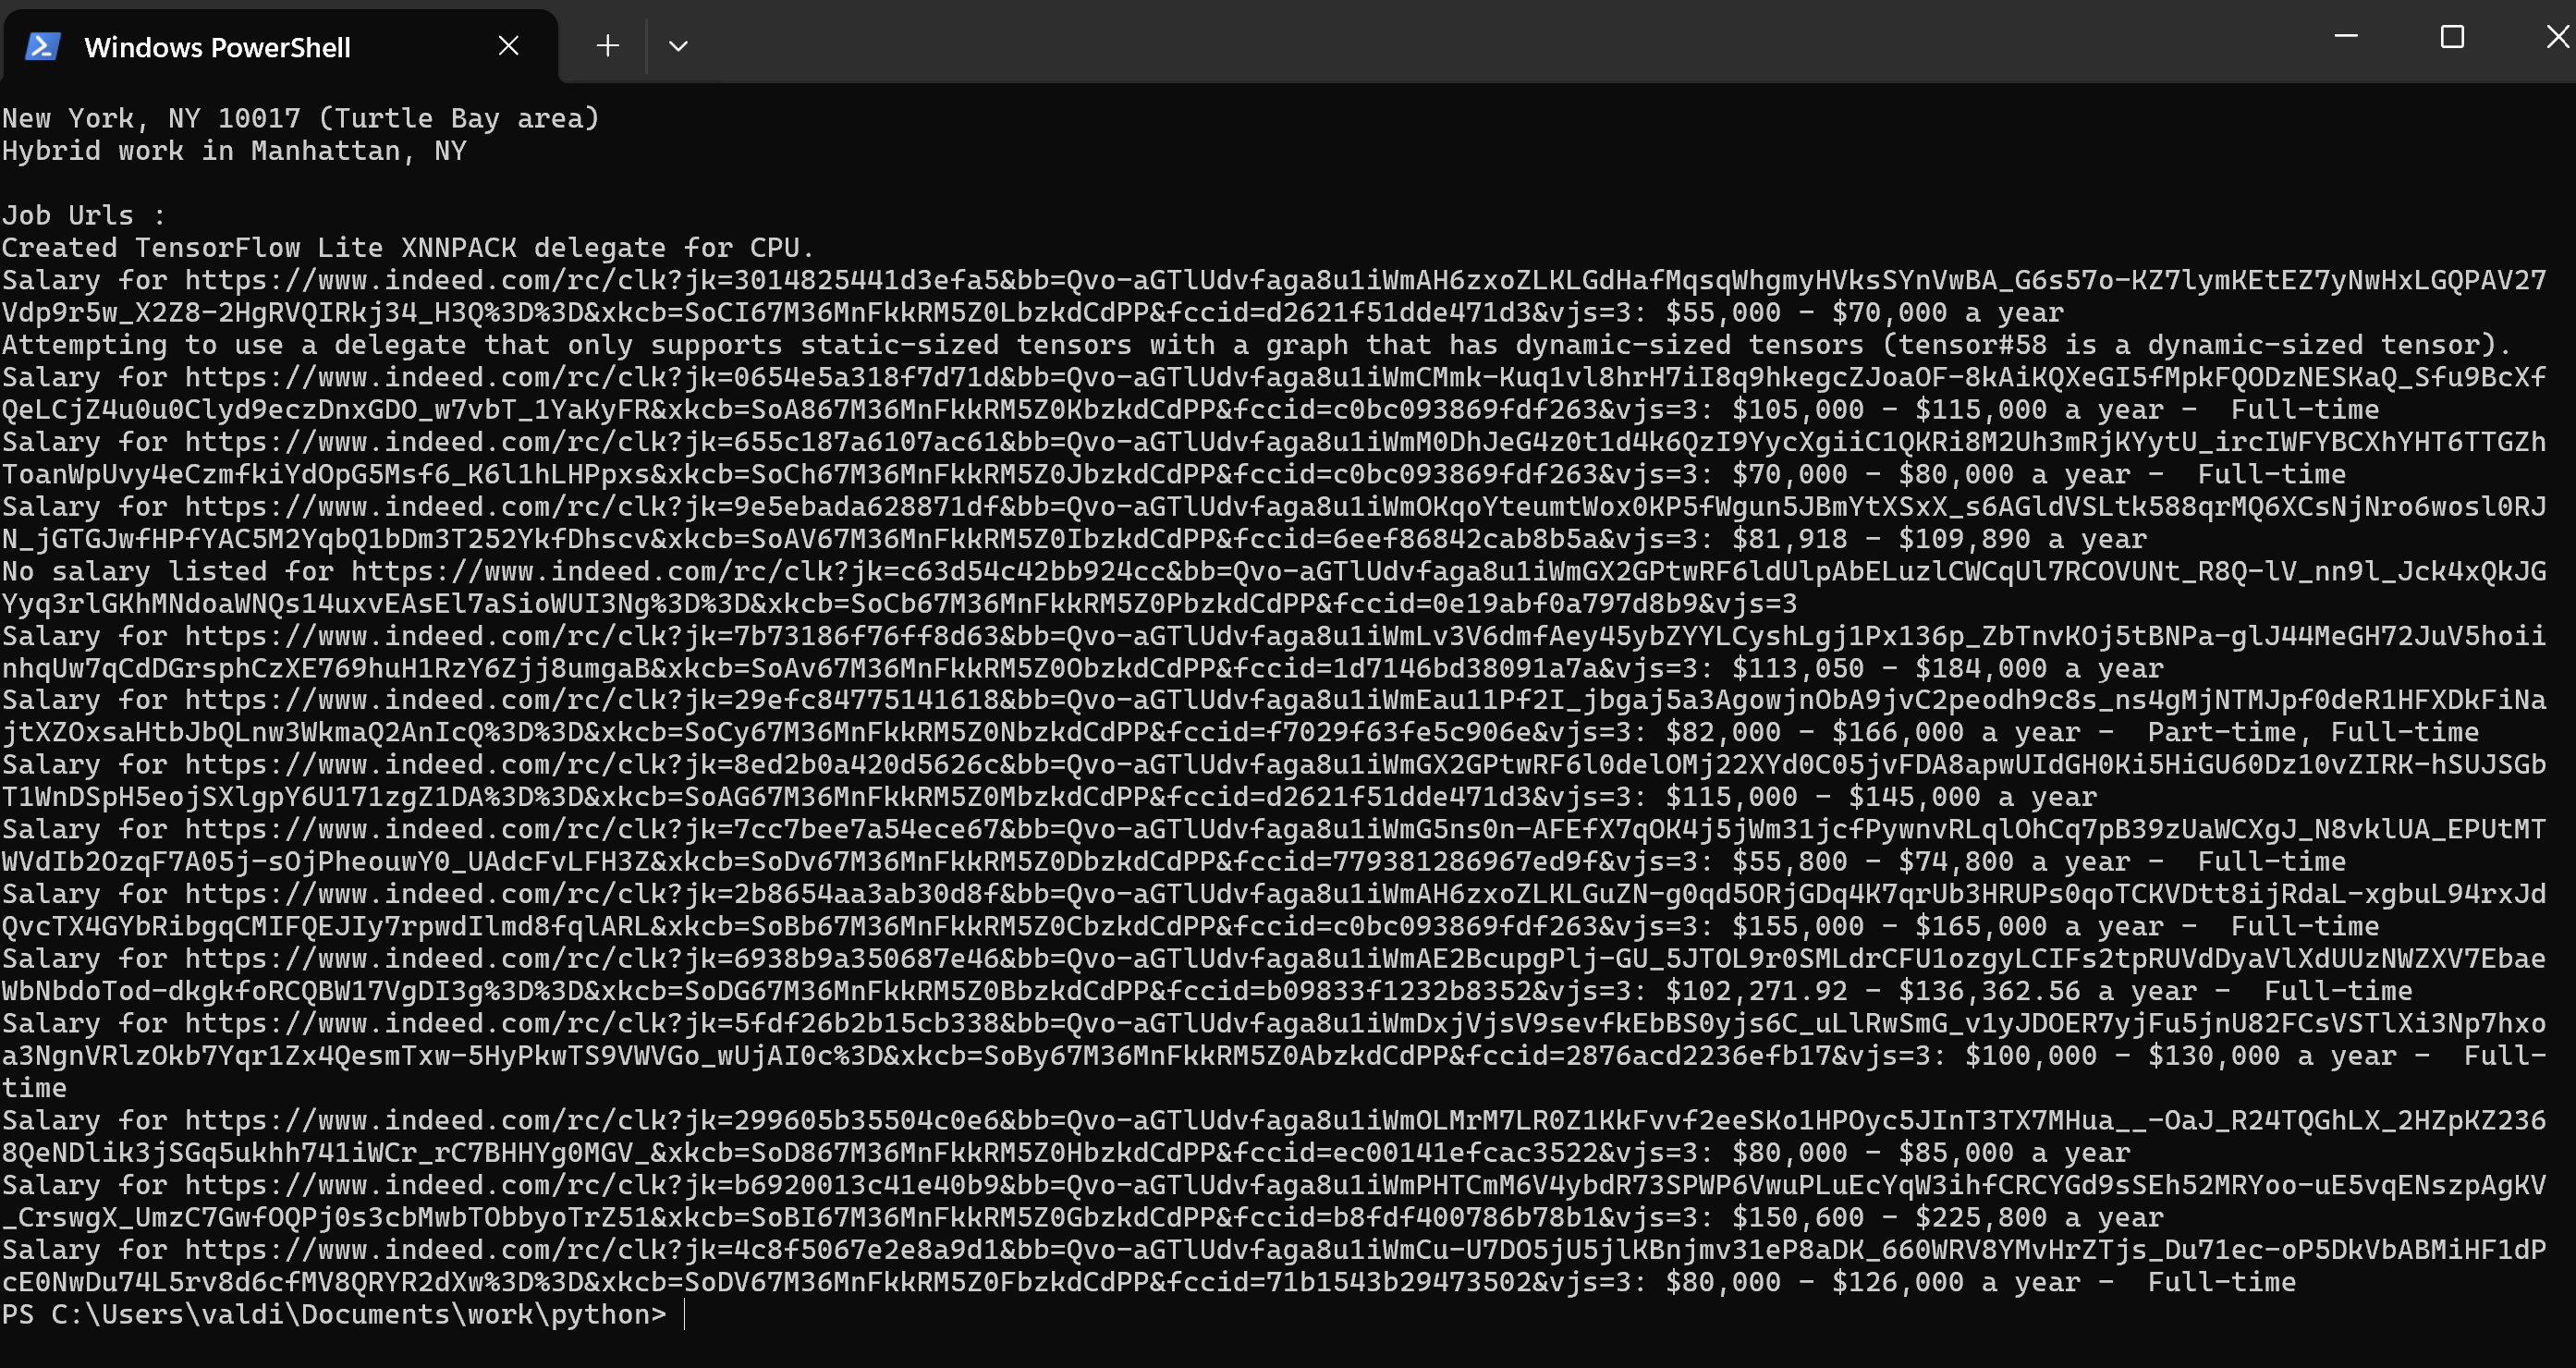
On other job boards, you may need to replicate an AJAX request to load salary information. AJAX is a request that a web page can make in the background to collect data from the server without reloading the page. It is usually used to refresh sections of the page, like the details of a job or salary, very fast.
For instance, you could leverage Selenium to wait for the content to be returned by the AJAX call: (Pseudo code)
WebDriverWait(driver, 10).until(EC.presence_of_element_located((By.CLASS_NAME, 'salary-snippet')))You can copy and paste the Full job board scraper here :
import requests
from bs4 import BeautifulSoup

from selenium import webdriver
from selenium.webdriver.chrome.service import Service
from selenium.webdriver.common.by import By
from selenium.webdriver.chrome.options import Options
import time
import pandas as pd

# Set up Chrome options
chrome_options = Options()
chrome_options.add_argument("--headless")  # Run Chrome in headless mode (without GUI)
chrome_options.add_argument("user-agent=Mozilla/5.0 (Windows NT 10.0; Win64; x64) AppleWebKit/537.36 (KHTML, like Gecko) Chrome/91.0.4472.124 Safari/537.36")
chrome_options.add_argument("accept-language=en-US,en;q=0.9")

# Path to your ChromeDriver
webdriver_path = r'C:\Users\valdi\Documents\work\python\lib\chromedriver-win64\chromedriver.exe'  # Replace with your actual path

# Set up the WebDriver
service = Service(webdriver_path)
driver = webdriver.Chrome(service=service, options=chrome_options)

# URL of the job listings page
url = 'https://www.indeed.com/jobs?q=growth+marketing&l=New+York%2C+NY&from=searchOnDesktopSerp&vjk=655c187a6107ac61'

# Open the job board page
driver.get(url)

# Give time for the page to load completely
time.sleep(10)  # You can adjust this depending on the page load time

# Fetch the page's HTML content
page_source = driver.page_source

# Print a portion of the page to check
#print(page_source[:1000])  # Print the first 1000 characters of the HTML

# Parse the HTML content using BeautifulSoup
soup = BeautifulSoup(page_source, 'html.parser')

# Find all job titles (adjust the tag and class based on the site structure)
job_titles = soup.find_all('h2', class_='jobTitle')

print("\nJob titles :")

# Loop through the job titles and print them
for job in job_titles:
    print(job.get_text().strip())

# Extract company names using the data-testid attribute
company_names = soup.find_all('span', {'data-testid': 'company-name'})

print("\nCompany names :")

# Loop through and print company names
for company in company_names:
    print(company.get_text().strip())

print("\nJob Locations :")

# Extract locations using the data-testid attribute
locations = soup.find_all('div', {'data-testid': 'text-location'})

# Loop through and print locations
for location in locations:
    print(location.get_text().strip())


print("\nJob Urls :")

# Extract job URLs from the main listing page
job_links = soup.find_all('a', class_='jcs-JobTitle')

job_urls = []
base_url = 'https://www.indeed.com'  # Base URL for Indeed

# Loop through the job links and extract the href attribute
for link in job_links:
    href = link.get('href')
    if href:
        full_url = base_url + href
        job_urls.append(full_url)

# Print extracted job URLs
# for url in job_urls:
#    print(url)

for job_url in job_urls:
    # Open the job detail page
    driver.get(job_url)
    time.sleep(5)  # Adjust the sleep time to allow the page to load

    # Get the updated page source after loading the job detail page
    job_detail_page_source = driver.page_source
    job_soup = BeautifulSoup(job_detail_page_source, 'html.parser')

    # Extract salary (you'll need to inspect the job detail page to get the exact tag and class)
    salary = job_soup.find('div', id='salaryInfoAndJobType')  # Adjust the class or tag as needed
    if salary:
        print(f"Salary for {job_url}: {salary.get_text().strip()}")
    else:
        print(f"No salary listed for {job_url}")

# Close the WebDriver
driver.quit()
This is great! You’ve automated extracting 15 job listings, but if you’re an HR or growth hacker, you’ll need more. Indeed shows over 1000 Growth jobs in New York in our Tutorial example. Handling pagination is crucial to scrape all listings efficiently. And all of this is just the begining of the journey !
Step 5: Scraping Across Multiple Pages - The Problem of Pagination
You might have guessed it by now, but if we continue and scrape page after page on Indeed continuously, they may notice this. In other words, scraping all the pages without even a little break can be easily perceived as weird behavior.
After all, no one goes through 100 pages of job listings in a matter of seconds! Do you ?
First, in order to safely scrape several pages, we need to introduce random delays. In this way, it'll slow down our requests and make them look more like the requests of a human browser. Later on, we'll probably want to consider some other things, but right now, just adding these random delays will help us minimize the risk.
Let's try it and see how far we can get with this change!
Code Example: Scraping Multiple Pages with Pagination
Here's how we can refactor your code to handle pagination and scrape job data from multiple pages:
import requests
from bs4 import BeautifulSoup

from selenium import webdriver
from selenium.webdriver.chrome.service import Service
from selenium.webdriver.common.by import By
from selenium.webdriver.chrome.options import Options
import time
import random  # Import random to create random delays
import pandas as pd

# Set up Chrome options
chrome_options = Options()
chrome_options.add_argument("--headless")  # Run Chrome in headless mode (without GUI)
chrome_options.add_argument("user-agent=Mozilla/5.0 (Windows NT 10.0; Win64; x64) AppleWebKit/537.36 (KHTML, like Gecko) Chrome/91.0.4472.124 Safari/537.36")
chrome_options.add_argument("accept-language=en-US,en;q=0.9")

# Path to your ChromeDriver
webdriver_path = r'C:\Users\valdi\Documents\work\python\lib\chromedriver-win64\chromedriver.exe'  # Replace with your actual path

# Set up the WebDriver
service = Service(webdriver_path)
driver = webdriver.Chrome(service=service, options=chrome_options)

# URL of the job listings page
url = 'https://www.indeed.com/jobs?q=growth+marketing&l=New+York%2C+NY&from=searchOnDesktopSerp&vjk=655c187a6107ac61'

page_number = 0
while True:
    page_number += 1
    url = url + f"&start={page_number * 10}"  # URL for pagination: Each page increases by 10

    if page_number == 5:
        break  # Remove or comment this line to scrape all pages

    # Open the job board page
    driver.get(url)

    # Give time for the page to load completely
    time.sleep(random.uniform(5, 10))  # You can adjust this depending on the page load time

    # Fetch the page's HTML content
    page_source = driver.page_source

    # Print a portion of the page to check
    #print(page_source[:1000])  # Print the first 1000 characters of the HTML

    # Parse the HTML content using BeautifulSoup
    soup = BeautifulSoup(page_source, 'html.parser')

    # Check if there are no more jobs (you can customize this logic based on the site's behavior)
    if "did not match any jobs" in soup.text:
        print("No more jobs found.")
        break

    # Find all job titles (adjust the tag and class based on the site structure)
    job_titles = soup.find_all('h2', class_='jobTitle')

    print(f"\nPage {page_number} Job titles :")

    # Loop through the job titles and print them
    for job in job_titles:
        print(job.get_text().strip())

    # Extract company names using the data-testid attribute
    company_names = soup.find_all('span', {'data-testid': 'company-name'})

    print("\nCompany names :")

    # Loop through and print company names
    for company in company_names:
        print(company.get_text().strip())

    print("\nJob Locations :")

    # Extract locations using the data-testid attribute
    locations = soup.find_all('div', {'data-testid': 'text-location'})

    # Loop through and print locations
    for location in locations:
        print(location.get_text().strip())


    print("\nJob Urls :")

    # Extract job URLs from the main listing page
    job_links = soup.find_all('a', class_='jcs-JobTitle')

    job_urls = []
    base_url = 'https://www.indeed.com'  # Base URL for Indeed

    # Loop through the job links and extract the href attribute
    for link in job_links:
        href = link.get('href')
        if href:
            full_url = base_url + href
            job_urls.append(full_url)

    # Print extracted job URLs
    # for url in job_urls:
    #    print(url)

    for job_url in job_urls:
        # Open the job detail page
        driver.get(job_url)
        time.sleep(random.uniform(3, 6))  # Another random delay before fetching the job details

        # Get the updated page source after loading the job detail page
        job_detail_page_source = driver.page_source
        job_soup = BeautifulSoup(job_detail_page_source, 'html.parser')

        # Extract salary (you'll need to inspect the job detail page to get the exact tag and class)
        salary = job_soup.find('div', id='salaryInfoAndJobType')  # Adjust the class or tag as needed
        if salary:
            print(f"Salary for {job_url}: {salary.get_text().strip()}")
        else:
            print(f"No salary listed for {job_url}")

     # Add another random delay before moving to the next page
    time.sleep(random.uniform(5, 10))

# Close the WebDriver
driver.quit()
Step 6: Storing the Scraped Data to a CSV file
After we successfully scrape the job postings, this information needs to be sorted out in an organized manner. Pandas is a powerful python library that helps arrange data and modify it very easily.
Here, we will export the following information - Job Titles, Company Names, Locations, and Salaries with other information using Pandas to a CSV file.
Pandas converts the scraped data into table format. In this format, it is easy to analyze, filter, and export in various formats like CSV, Excel, or databases. It proves quite handy when handling voluminous data extracted from a number of pages.
Full Job board scraper Python file : Saving Data into a CSV File
import requests
from bs4 import BeautifulSoup
from selenium import webdriver
from selenium.webdriver.chrome.service import Service
from selenium.webdriver.common.by import By
from selenium.webdriver.chrome.options import Options
import time
import random
import pandas as pd

# Set up Chrome options
chrome_options = Options()
chrome_options.add_argument("--headless")  # Run Chrome in headless mode (without GUI)
chrome_options.add_argument("user-agent=Mozilla/5.0 (Windows NT 10.0; Win64; x64) AppleWebKit/537.36 (KHTML, like Gecko) Chrome/91.0.4472.124 Safari/537.36")
chrome_options.add_argument("accept-language=en-US,en;q=0.9")

# Path to your ChromeDriver
webdriver_path = r'C:\Users\valdi\Documents\work\python\lib\chromedriver-win64\chromedriver.exe'  # Replace with your actual path

# Set up the WebDriver
service = Service(webdriver_path)
driver = webdriver.Chrome(service=service, options=chrome_options)

# URL of the job listings page
url = 'https://www.indeed.com/jobs?q=growth+marketing&l=New+York%2C+NY&from=searchOnDesktopSerp&vjk=655c187a6107ac61'

# Initialize an empty list to store job data
job_data = []

page_number = 0
while True:
    page_number += 1
    url_with_page = url + f"&start={page_number * 10}"  # URL for pagination: Each page increases by 10

    if page_number == 5:
        break  # Remove or comment this line to scrape all pages

    # Open the job board page
    driver.get(url_with_page)

    # Give time for the page to load completely
    time.sleep(random.uniform(5, 10))  # You can adjust this depending on the page load time

    # Fetch the page's HTML content
    page_source = driver.page_source

    # Parse the HTML content using BeautifulSoup
    soup = BeautifulSoup(page_source, 'html.parser')

    # Check if there are no more jobs (you can customize this logic based on the site's behavior)
    if "did not match any jobs" in soup.text:
        print("No more jobs found.")
        break

    # Find all job titles (adjust the tag and class based on the site structure)
    job_titles = soup.find_all('h2', class_='jobTitle')
    company_names = soup.find_all('span', {'data-testid': 'company-name'})
    locations = soup.find_all('div', {'data-testid': 'text-location'})

    # Extract job URLs from the main listing page
    job_links = soup.find_all('a', class_='jcs-JobTitle')
    job_urls = []
    base_url = 'https://www.indeed.com'  # Base URL for Indeed

    # Loop through the job links and extract the href attribute
    for i, link in enumerate(job_links):
        href = link.get('href')
        if href:
            full_url = base_url + href
            job_urls.append(full_url)
            job_title = job_titles[i].get_text().strip()
            company_name = company_names[i].get_text().strip() if i < len(company_names) else 'N/A'
            location = locations[i].get_text().strip() if i < len(locations) else 'N/A'

            # Append the job data to the list with the job URL
            job_data.append({
                'Job Title': job_title,
                'Company Name': company_name,
                'Location': location,
                'Job URL': full_url  # Add the job URL
            })

    for job in job_data[-len(job_urls):]:  # Only process the new job entries
        # Open the job detail page
        driver.get(job['Job URL'])
        time.sleep(random.uniform(3, 6))  # Another random delay before fetching the job details

        # Get the updated page source after loading the job detail page
        job_detail_page_source = driver.page_source
        job_soup = BeautifulSoup(job_detail_page_source, 'html.parser')

        # Extract salary (you'll need to inspect the job detail page to get the exact tag and class)
        salary = job_soup.find('div', id='salaryInfoAndJobType')  # Adjust the class or tag as needed
        salary_text = salary.get_text().strip() if salary else 'No salary listed'

        # Append the salary to the job entry
        job['Salary'] = salary_text

    # Add another random delay before moving to the next page
    time.sleep(random.uniform(5, 10))

# Close the WebDriver
driver.quit()

# Create a Pandas DataFrame from the job data
df = pd.DataFrame(job_data)

# Save the DataFrame to a CSV file
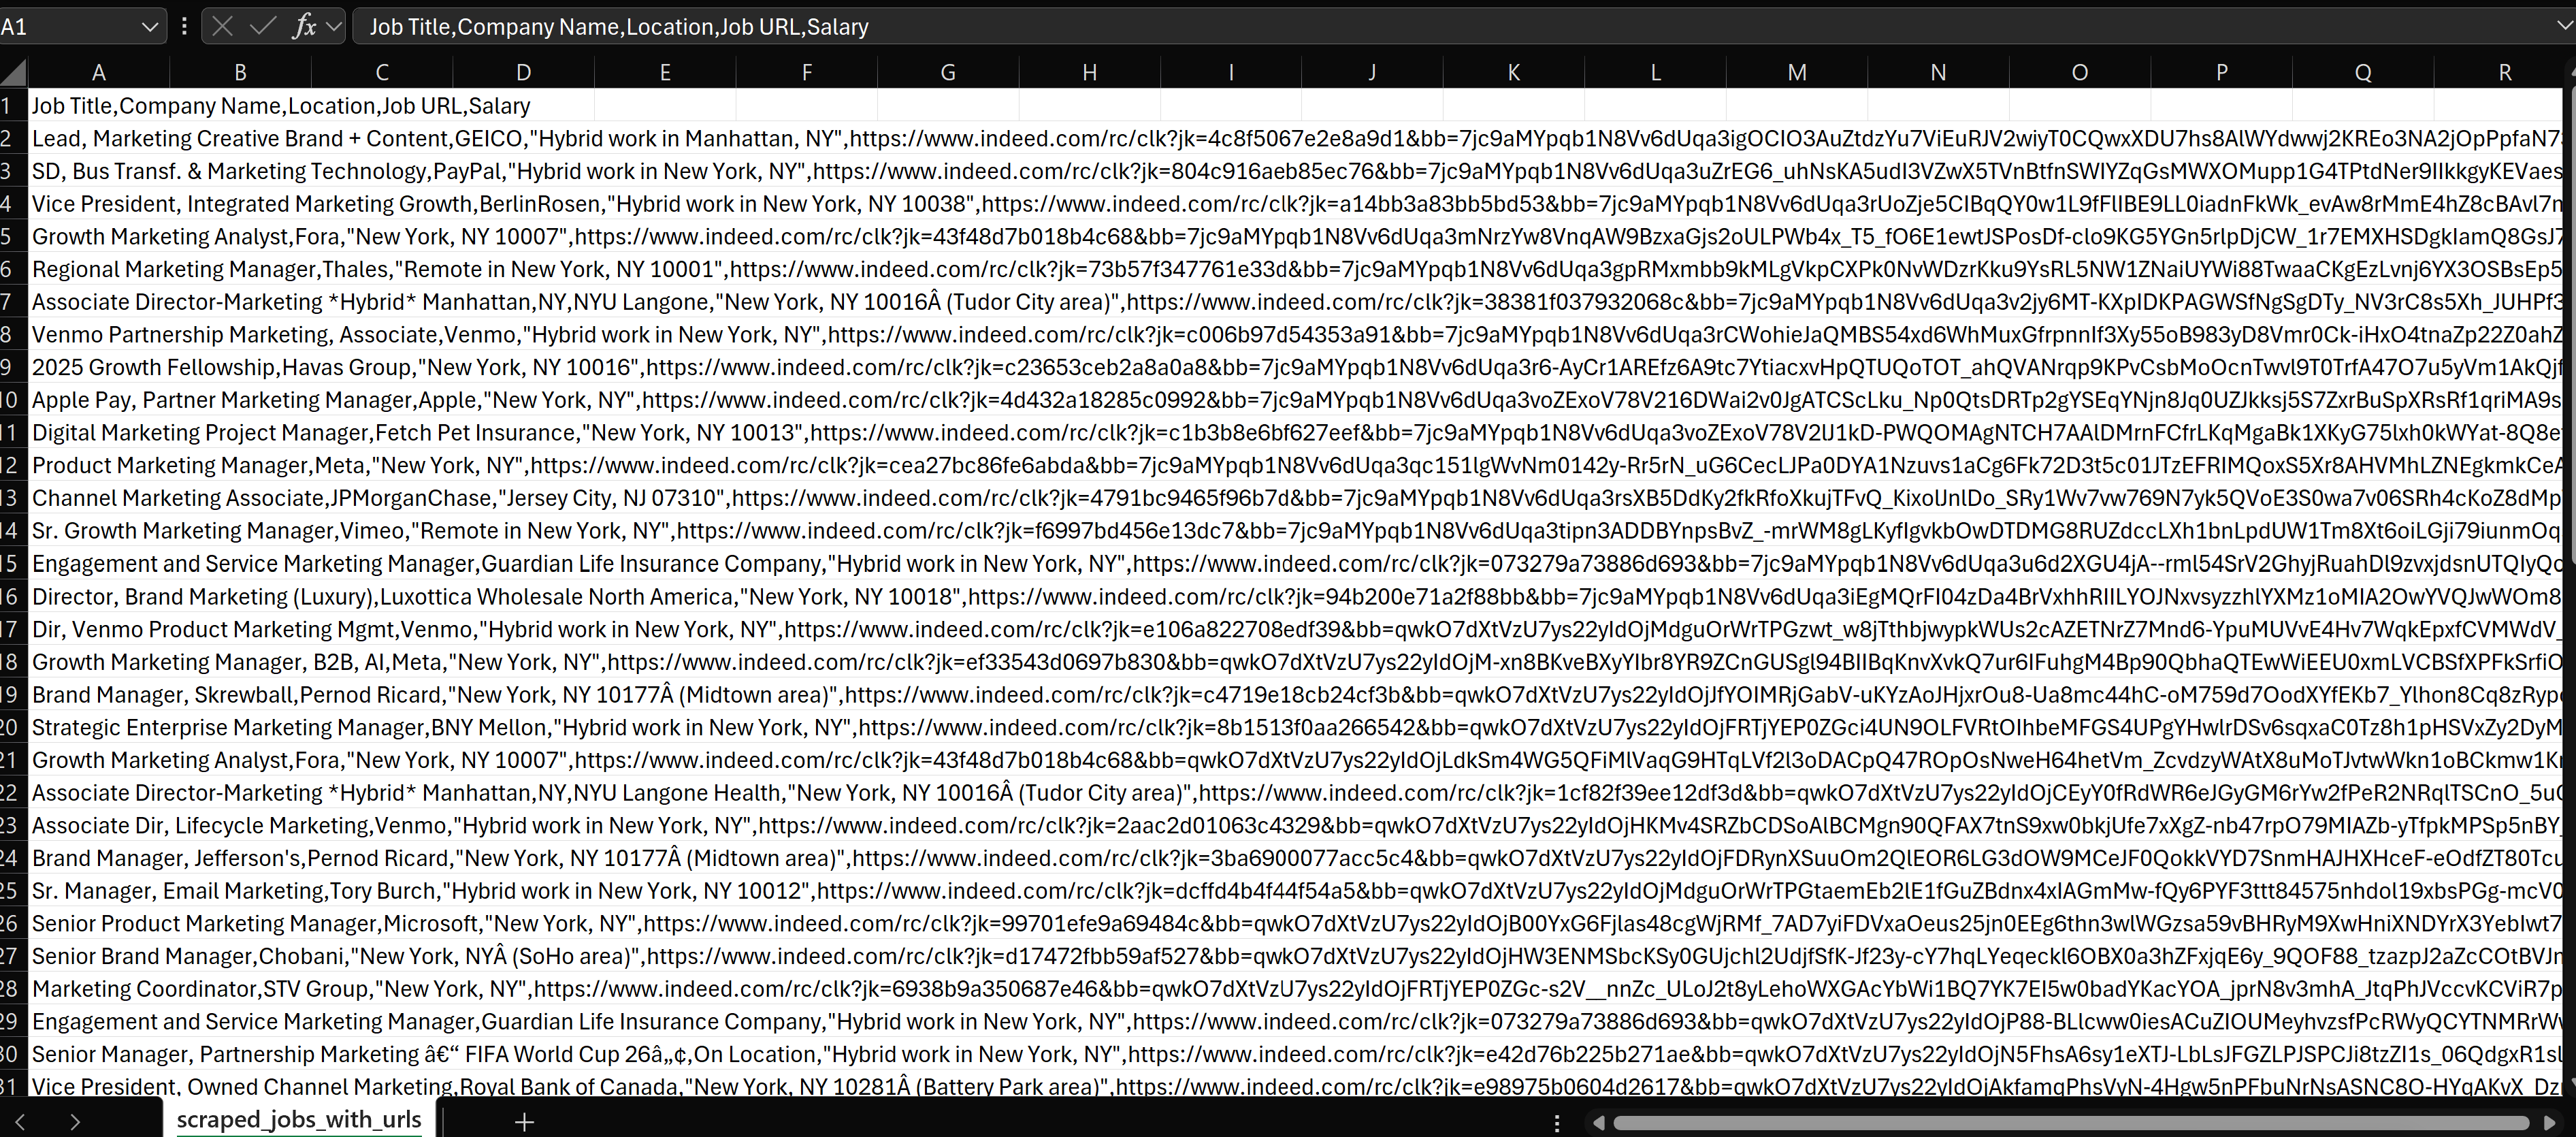
df.to_csv('scraped_jobs_with_urls.csv', index=False)

print(f"Scraped data saved to 'scraped_jobs_with_urls.csv'")
Addressing Common Challenges in Job scraping job postings with Python
As we've gone through scraping job data, we've tackled a few big hurdles, but others remain. Here’s a quick recap of what we’ve solved and what’s left to explore:
Challenges We’ve Overcome:
What's Still Ahead:
Conclusion and Alternative Tools to Save Time for Developers and Non-Coders
In this guide, you’ve set up Python for web scraping, learned how to extract job data from job boards using Selenium, handled pagination to scrape multiple pages with random delays, and saved your data in a CSV file with Pandas.
Now you are ready to collect and organize job posting data for your projects efficiently.
If making and maintain your own job scraper seems like too much effort, there are simpler ways of collecting information on jobs.
API-Based Data Collection
Some companies specialised on Job Postings data provide an API for developers to fetch their current job postings in an easy manner. These APIs usually handle pagination and filtering for the developer to ease up the entire data collection process and make it faster.
This APIs can be located on platforms such as RapidAPI. For example, Mantiks offers an API for Indeed job postings, providing seamless access to the latest job data.
Explore the Mantiks API for Indeed here.
No Code Job Scraping Tools
Web Scraping Without Coding Tools make it really easy for non-coders to collect job data. With just a few clicks, you can gather information without actually writing any code.
Mantiks streamlines your workflow, improves your outreach strategy, and delivers valuable insights. Plus, it helps you gather key decision-maker contact details!
Get the full picture on job scraping! Check out our Complete Guide to Job Scraping for an in-depth look at all the methods and tools you need to effectively extract job data.
About the author

Alexandre Chirié
CEO of Mantiks
Alexandre Chirié is the co-founder and CEO of Mantiks. With a strong engineering background from Centrale, Alexandre has specialized in job postings data, signal identification, and real-time job market insights. His work focuses on reducing time-to-hire and improving recruitment strategies by enabling access to critical contact information and market signals.
